Pages

Sunday, May 29, 2011

Oxtail Soup with Tomatoes, Love, Happiness, and World Peace

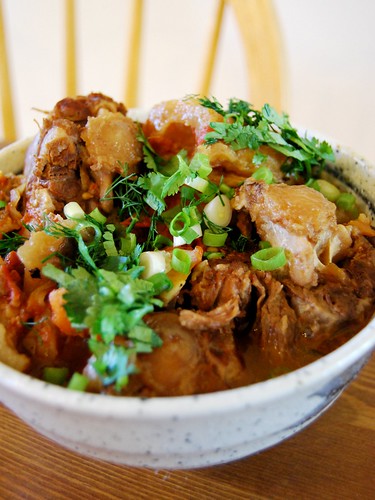
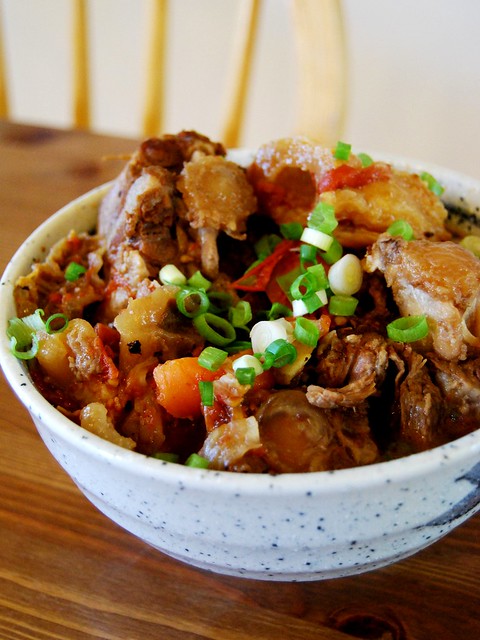
Few things in life are as comforting as a nice steaming bowl of oxtail soup and a meal with family. This recipe is a family favorite! It's top secret too. Don't tell anyone.

Oxtail Soup with Tomatoes, Love, Happiness, and World Peace
cooking oil or butter
4 large oxtail bones + 6 small oxtail bones
3/4 cup shaoxing wine
1 pound beef tendons + a stub of ginger
2 yellow onions, roughly chopped
a few thin slices ginger
2 carrots, cut on a diagonal into 1-inch chunks
4 celery stalks, cut on a diagonal into 1-inch chunks
10ish medium sized ripe tomatoes, roughly chopped
1 bay leaf, 1 star anise, 1 rosemary sprig, 1 thyme sprig (optional)
6 plump cloves of fresh garlic
1 tsp sea salt
4 fingerling potatoes, cut on a bias into 1-inch chunks
Thai basil (optional)

1. Heat a large pot over medium high heat, add 1 Tbsp oil and heat until shimmering. Add oxtails and cover with lid for 2 minutes, until the meat is golden brown. Flip and continue until seared all around. Remove oxtails to a plate and add a splash of wine, scraping up the yum yums at the bottom of the pot.
2. In the meantime, heat another small pot of water and the tendons and ginger and touch of wine to a boil over high heat. Simmer for 10 minutes, then drain and set aside the tendons.
3. Add a little more oil to the pot and toss in the onions and ginger. Cook over medium heat until onions are softened and smell delicious, 5-8 minutes. Add 3 celery stalks and 1 carrot, season lightly with salt, and continue to cook a few minutes until you smell the celery and carrots.
4. Add half of the tomatoes, the 1 tsp salt, and the herbs (if using). Add the oxtails and tendons. Add the rest of the tomatoes.
5. Turn heat to high and bring to a boil. Turn heat down to the very lowest, most pathetic setting to maintain a very shy simmer - you don't want to vigorously simmer because the meat will get tough. After 15 or 20 minutes, check to see if the tomatoes are breaking down and releasing their juices; mix the stew and smash the tomatoes a bit to help it along. If there is not enough liquid to cover all the bones by about 1/2 inch, do not add water! Just add two or three more tomatoes or beef broth if you have it on hand. The key is to maintain a bare simmer for 3 hours, or until the meat is just beginning to fall off the bone.
6. One and a half hours before dinner time, add the remaining carrots and taste the soup. Add more salt if needed. Skim surface fat if there's a lot of fat.
7. One hour before dinner time, add the rest of the celery and the potatoes. Add the garlic cloves 15 minutes later - they will become meltingly sweet!
8. Ten minutes before dinner, season the soup to taste with salt. Add the basil to the soup if using.
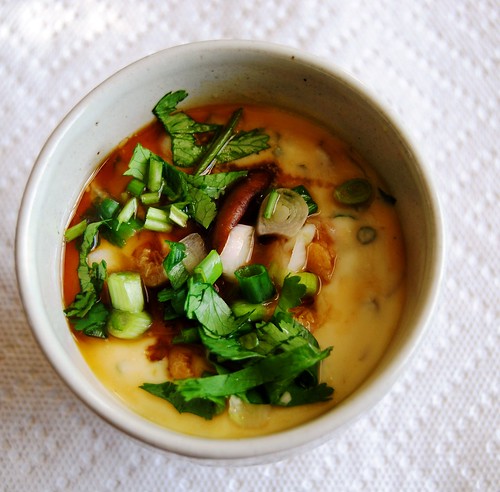
9. Remove basil and bay leaf. Call everyone to dinner and let people pick out their favorite veggies and oxtails and tendons from the pot. Garnish with chopped cilantro, dill, or scallions if desired; but honestly, the soup doesn't need any of that stuff.
Tips
- You may be tempted to use canned tomatoes. Don't! Just don't. They are sour. You can add them if you want, but keep in mind that you would be making "oxtail soup" and not the version with love, happiness, and world peace.
- Feel free to add some tomato paste if you really like tomatoes!
- Don't let the stew boil or the meat will get tough and stringy.
- Don't stew for much longer than 3 hours because the meat will get too tender and it will just fall apart; you want a little chew, but you want the gelatin to dissolve and make the soup thick and satiny.
- Don't add too much salt! The soup will reduce as it cooks, so it's better to undersalt the soup initially. It's really easy to add too much salt, so watch out!
- Don't worry if you can't finish this on the day of. The next day it tastes even better - not sure why.
- The quality of the tomatoes, carrots, celery, and garlic matters! Use ripe, fresh veggies from the Farmer's Market if possible.
- Boiling the tendons helps get rid of some of that stinky cow smell.
- Adding some of the veggies later ensures that they retain their bright color and don't dissolve into the stew; but adding some in the beginning is important for flavor.

Saturday, May 28, 2011

Gordon Ramsay's Strawberry Glory

"The totness of the balsameeck vinegah against the sweetness of the strawburries is mind-blowing" - Chef Gordon Ramsay.

We couldn't have said it better ourselves. This dessert is balanced on so many levels - temperature, texture, flavor, and color. The caramelized balsamic vinegar syrup enhances the tangy sweetness of the fresh berries, and the super sweet crunchy meringue bits are perfectly suspended in the creamy, silky smooth whipped cream lightened vanilla bean pastry cream. We never thought meringue would taste so addictingly delicious! They are basically crunchy explosions of sugary marshmallowy flavor. Alone they are cloyingly sweet, but against the tart berries, balsamic caramel syrup, and lightly sweetened cream, they are perfect.

Also, being the meringue noobs we were, we toasted them a little too much so they lost their snowy white color and instead turned a light tan. This actually added some additional caramelized flavor! Also, we didn't put the meringues in an airtight container overnight so they were soft the next morning, to our dismay. But after 5 minutes in the oven at 250 degrees F, they became crunchy once more upon returning to room temperature. The pastry cream is to die for; barely sweetened, with a hint of vanilla and the perfect silky smooth texture. We suspect that the use of both cornstarch and flour enables a creamy texture that isn't too gummy or runny.

Chef Ramsay used vanilla ice cream and a "good ol' English wafer" to garnish, but we opted for our raspberry ice cream and a fresh mint sprig. The only things we would change are to add more balsamic vinegar and sugar to make a richer, more flavorful syrup, and to make sure that the heat is very high to enable maximum caramelization. A few extra meringue crumbs in the parfait wouldn't be bad either.


oh hello!

Gordon Ramsay Strawberry Glory

Serves 4 - 6
Ingredients

Approx 80g meringues, crushed

300g fresh strawberries, quartered

Icing sugar to dust (be generous!)

Balsamic vinegar to drizzle (go heavy!)

240ml double cream

1 tbsp icing sugar

4- 6 scoops vanilla ice cream (we used raspberry)

Plain chocolate to grate (skipped this; added more meringue)

Wafer fans to garnish (didn't have these! used mint)

For the crème pâtissière (makes about 320g):

150 ml milk

100ml double cream

20g plain flour

15g cornflour (cornstarch)

3 free range large egg yolks

40g caster sugar

1. For the crème patissière base: heat the milk and cream in a heavy-based saucepan until almost boiling. Sift the flour and cornflour together. Beat the egg yolks and sugar together in a large bowl then mix in the flour. Add a splash of the hot creamy milk and whisk well until the mixture is smooth, then gradually whisk in the rest of the milk. Pour back into the pan and whisk over a medium-low heat for 3-5 minutes until thickened and smooth. Transfer to a bowl, cover and cool to room temperature, stirring occasionally to prevent a skin forming.

2. Quarter the strawberries and dust with icing sugar. Drizzle over the balsamic vinegar and toss to coat. Quickly cook the strawberries in a hot pan for 1minute until the strawberries just begin to break down. Spoon on to a plate and allow to cool.

3. Whip the double cream with a tablespoon of icing sugar to soft peak stage. Mix the whipped cream and crème patisserie together - the mixture should be two thirds cream to one third crème patisserie.

4. Layer the bottom of the glasses with some strawberries, scatter over some meringue then pipe over a little of the mixed cream. Repeat the layering as necessary and top with a spoonful of ice cream, a drizzle of sauce and a grating of chocolate. Garnish with a fan wafer and serve at once.

Thursday, May 26, 2011

Dinner and Raspberry Ice Cream Dessert

A simple dinner of blanched greens with extra virgin olive oil (organic, from where else but Costco?); stir fried mushrooms with fermented black beans, garlic, smoky dried sichuan peppers, and black heritage pork; stir fried Chinese celery with smoked pressed tofu, pork, and fermented black beans.
David Lebovitz' raspberry ice cream. The raspberries are not cooked, so the flavor of the fresh berries is maintained and the end result it simply divine. Words cannot describe the fruity freshness of the flowery raspberries!

1½ cups (375ml) half-and-half
1 cup (200g) granulated sugar
pinch of salt
1½ cups (375ml) heavy cream
4 large egg yolks
1½ cups (375ml) strained black raspberry purée (from fresh or thawed frozen berries)
1 tablespoon lemon juice
about 1/8 t xanthan gum (optional; helps keep ice cream scoopable)

-Warm the half-and-half, pinch of salt and about half of the sugar in a medium saucepan. Pour the cream into a large bowl and set a mesh strainer over the top.

-In a separate medium bowl, vigorously whisk together the egg yolks with the other half of the sugar. Slowly pour the warm liquid into the egg yolks, whisking constantly, then scrape the warmed egg yolks back into the saucepan.

-Stir the mixture constantly over medium heat with a heatproof spatula, scraping the bottom as you stir, until the mixture thickens and coats the spatula. Vigorously whisk in the xanthan gum, if using, and quickly pour the custard through the strainer and stir it into the cream. Mix in the raspberry purée and lemon juice, then stir until cool over an ice bath.

-Chill thoroughly in the refrigerator, but to preserve the fresh berry taste, churn the ice cream within four hours of making the mixture.

Rustic Blueberry Tart

Rustic blueberry tart, inspired by two recipes from Taste of Home. One of them was a peach blueberry pie, and the other was a blackberry blueberry rustic tart. The tart was so delicious, and the buttermilk tart shell was flaky and flavorful, although next time we would leave out the cornmeal because it added a gritty texture. The lemon zest in the crust is phenomenal! Next time we would pulse it with the sugar and flour to infuse the whole crust before adding the butter.


Ingredients

  • 2 cups all-purpose flour
  • 1/3 cup sugar
  • 1/4 cup yellow cornmeal (might leave this out, or use finely ground cornmeal)
  • 2/3 cup cold butter
  • 1/2 cup buttermilk
  • 2 Tbsp lemon zest (optional, but highly recommended!)


  • FILLING:
  • 4 cups fresh blueberries (used frozen blueberries, and cooked the fruit mixture to reduce liquid)
  • 2 cups fresh blackberries (substituted frozen peaches)
  • 2/3 cup sugar (reduced a little)
  • 1/3 cup all-purpose flour
  • 2 tablespoons lemon juice
  • 1 egg, beaten (used one yolk beaten with tablespoon of milk)
  • 2 tablespoons turbinado (washed raw) sugar or coarse sugar
  • Whipped cream, optional

Directions

  • (we used a food processor for this part - lazy method!) In a large bowl, combine the flour, sugar and cornmeal; cut in butter until crumbly. Gradually add buttermilk, tossing with a fork until dough forms a ball. Cover and refrigerate for at least 30 minutes.
  • On a lightly floured surface, roll dough into a 14-in. circle. Transfer to a parchment paper-lined baking sheet.
  • In a large bowl, combine the berries, sugar, flour and lemon juice; spoon over the pastry to within 2 in. of edges. Fold up edges of pastry over filling, leaving center uncovered. Brush folded pastry with egg; sprinkle with sugar.
  • Bake at 375° for 55-60 minutes or until crust is golden brown and filling is bubbly. Using the parchment paper, slide tart onto a wire rack to cool. Serve with whipped cream if desired. Yield: 8 servings.

Sunday, April 3, 2011

Asian 5-Ingredient Fix

I was watching 5 Ingredient Fix by Claire Robinson the other day and she kind of cheated because she made this one steak with 5 ingredients, and then another sauce with 5 ingredients, and slapped the two together. Whoa, if kindergarten serves me correctly I think 5 + 5 equals 10, no? Pretty sneaky there, Claire! Well anyway, a lot of Chinese stir fried vegetables are easily 5 ingredients or less, and very delicious. The above shot is burdock root (gobo) with carrots, and uses dried chilies, oil, salt, and a sprinkling of sesame seeds. The dish below combines garlic, the skinny cousin twice removed of broccolini, oil, and salt. That's like 3 ingredients not counting salt! Trust me, it's so delicious. The inherent sweetness of the veggie really gets to shine in a simple dish like this.

The trick to making it taste good? You gotta make sure your oil is hot and well flavored with garlic before adding the veggies, and then you need to flip the veggies constantly while you cook over high heat to make sure you cook it evenly and distribute salt and oil well. And of course, take it off the heat when it's just bright green and done, not overcooked and yellow and gross.

Tofu Chawanmushi

This healthy, silky smooth version of chawanmushi (Japanese steamed egg) includes tofu and the rich flavors of toona, shiitake, dried shrimp, and Chinese pickled vegetable. We used the tender shoots from the toona tree in our backyard. It's hard to describe the flavor of toona...imagine a really intense, meaty, mushroomy, bacon-y, soy-saucy, savory and almost salty, saliva-inducing flavor packed into a tiny leaf. Got it? Good for you!
A garnish of freshly cut scallions from the Farmer's Market and a drizzle of seasoning sauce provide the perfect flavor contrast to the egg.
These were super easy to make, and you can add your own variations simply by switching out the flavoring components. The original recipe called for fresh shrimp which we didn't have on hand, so we just used dried shrimp (pre-soaked in water). Fresh shrimp probably would have been devilishly good. Otherwise, you just blend together 1 package of tofu, 2 eggs, 2 Tbsp shitake water (the water you have left after soaking shiitake; if you don't have this, chicken stock would work beautifully) and add a little bit of chopped shiitake, chopped pickled vegetables, etc. Cover with plastic wrap and steam for 13 minutes or until just set (don't over steam!) The sauce for topping is just a mix of soy sauce, sesame oil, and mirin in a 3:2:1 ratio, and you can garnish the cups with fresh cilantro and scallions.

Trail Mix Cookies

These are a slightly healthier version of regular cookies because they have reduced butter, oats, and whole wheat flour. They are still a treat though! Using melted butter helps encourage gluten formation, developing a chewier cookie. It also enables you to use less butter (only 5 Tbsp for 24 cookies!) because melted butter is easier to incorporate into the dough.
The cinnamon and brown sugar flavors combine perfectly with the oats, nuts, and dried fruit, producing a very flavorful cookie with great texture. Next time we will try toasting the oats to bring out their flavor more, and perhaps replacing some of the brown sugar with white sugar to cut back a little bit on the molasses notes and allow the oats and nuts to have their moment on the flavor stage. (Note: if you do this be sure to flatten the cookies a bit because they won't spread as much due to the reduced brown sugar; also, they will be less chewy)


Trail Mix Cookies
3/4 cup unbleached AP flour
1/2 cup whole wheat flour
1 cup of old fashioned oats (toasted)
1/4 tsp salt
1/2 tsp cinnamon
1/2 tsp baking soda
1 large egg
5 Tbsp butter, melted and cooled slightly
2 tsp vanilla extract
1/2 cup - 1 cup packed brown sugar*
1/4 cup chopped walnuts, almonds, or pecans
1/4 cup dried cherries, raisins, or cranberries
1/4 cup semisweet chocolate chips
1/4 cup sunflower or pumpkin seeds

1. Mix together flour, oats, baking soda, salt, and cinnamon in a bowl.
2. Beat egg and brown sugar with melted butter and vanilla extract.
3. Fold the flour mixture and butter mixture together, and then fold in the mix-ins.
4. Drop by heaping tablespoons onto baking sheet lined with parchment paper.
5. Bake at 350 degrees for 10-15 minutes, depending on whether you like your cookies soft and chewy (underbake them) or browned and crunchy (bake just shy of burnt).

*if you like sweeter, chewier, moister cookies, then use 1 cup. If you like less sweet, crunchier cookies then use 1/2 cup - but be sure to flatten them a little bit before baking because they will spread less.