Pages

Showing posts with label Chocolate. Show all posts

Tuesday, January 8, 2013

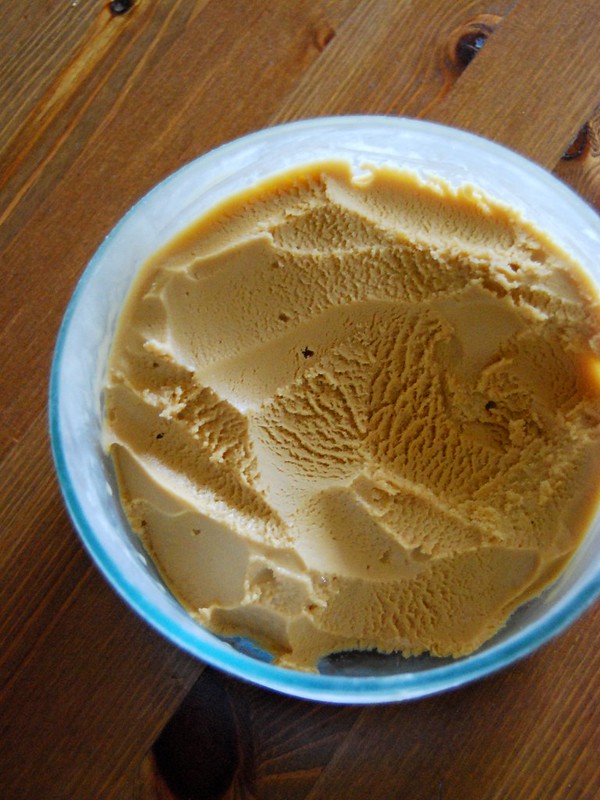
Caramelized White Chocolate Creme Fraiche Ice Cream


Do you like white chocolate? Doesn't it taste like milk, malted milk, vanilla, sugar, butter, peace, joy, and happiness all blended together? Now think about caramel. Roasty, buttery, slightly bitter, brown sugar and honey notes, just plain delicious. Yes. You know where this is going. What's the third thing I'm going to ask you to think of? Did I hear someone say ice cream? Ah, genius. But not just any old ice cream - we're talking creme fraiche ice cream. Ice cream with a slight tang, a rich buttery milky flavor. This ice cream is just that and more. The white chocolate keeps the texture velvety, and each bite is exquisite. The ice cream has a little resistance, not melting instantly but slowly pulling at your tastebuds in the way that chewy caramel lingers, before dissolving into buttery bliss.

The caramelization of the white chocolate takes some time - you need to stir it every 10 minutes or so as it bakes at a low temperature in the oven. However, if you have an hour to spare, do it. And make sure you use Valrhona chocolate because it has a high cocoa butter content, allowing it to melt smoothly without turning too chalky. This is one of the best ice creams we've ever made - right up there with champagne, green tea, jasmine, vanilla bean, bourbon, fresh strawberry, and garden mint, all in the ice cream hall of fame.

Caramelized White Chocolate Creme Fraiche Ice Cream (adapted from David Lebovitz's blog)
235 g (8.25 oz) Valrhona white chocolate pieces
¾ cup crème fraiche
1 ¼ cup whole milk
¼ cup sugar
3 large egg yolks
1 pinch of kosher salt

Caramelize white chocolate. Preheat oven to 250°F. Spread chocolate pieces on a Silpat or parchment lined baking sheet in a single layer and place in the oven. Take the tray out after 20 minutes to stir the chocolate and prevent burning. Keep stirring every 10 minutes for 1 hour or so, until the chocolate is caramelized, delicious smelling, and about the color of almond skins. Scrape the chocolate into a small bowl and keep warm and melted until ready to use. You should have about 180 g (6.25 oz) caramelized white chocolate.

Make custard. Place crème fraiche and ½ cup of the milk in a 4-cup glass measuring cup and put a fine mesh sieve on top. Bring remaining ¾ cup milk and half of the sugar (2 Tbsp) to a simmer in a heavy small saucepan over medium-high heat until steaming, stirring a bit to dissolve the sugar. Meanwhile, combine egg yolks and remaining 2 Tbsp sugar in medium bowl; whisk until thick and blended. Gradually whisk steaming milk mixture into yolk mixture. Pour everything back into the pot and stir constantly over medium-low heat, scraping into the corners of the pot, until custard thickens enough to leave path on back of a spatula or spoon when a finger is drawn across and temperature registers 178°F, about 3 minutes. Immediately pour through sieve into crème fraiche mixture. Mix a splash of custard into the melted caramelized white chocolate until smooth. Pour white chocolate mixture into the rest of the custard. Add a teeny pinch of salt, mix to dissolve, and taste and adjust salt as needed. Refrigerate at least 5 hours until completely cold (overnight is best). Churn in ice cream maker.

Friday, April 27, 2012

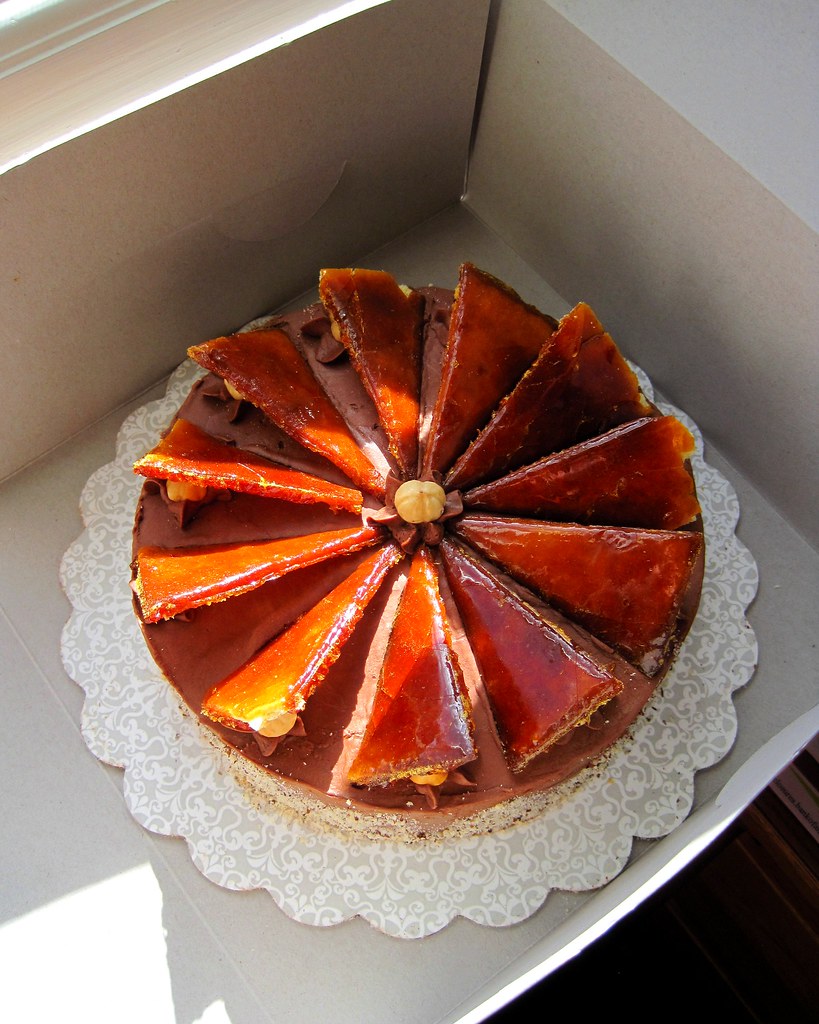
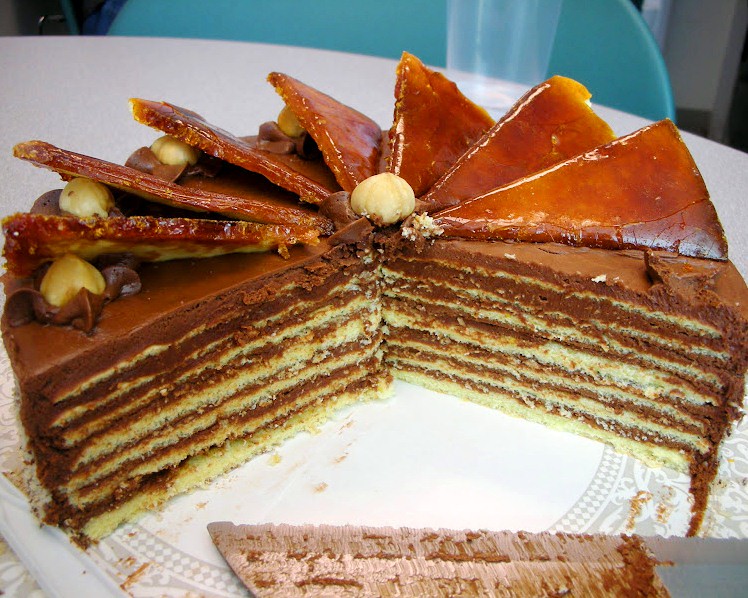
Dobos Torta


A Hungarian 7-layer sponge cake, filled with chocolate buttercream, topped with caramel-coated cake slices and garnished with toasted hazelnuts.

photo courtesy: cake hour blog
 
Dobos Torta 
modified from 2009 Daring Bakers ChallengeSmitten KitchenJoe Pastry 

Equipment
2 baking sheets
7" cake ring, for template
mixing bowls (1 medium, 1 large)
sieve
small saucepan
hand-held mixer
metal offset spatula
sharp knife
10” cardboard cake round
piping bag and tip, optional

SPONGE CAKE LAYERS
8 large eggs, separated, at room temperature
1 1/3 cups (162g) confectioner's (icing) sugar, divided
1 tsp (5g) pure vanilla extract
1 cup plus 2 Tbs (112g) Sifted cake flour (substitute: 95g plain flour + 17g cornstarch sifted together)
pinch of sea salt

1. Position the racks in the top and center thirds of the oven and heat to 425° F.
2. Cut four pieces of parchment paper to fit the baking sheets. Using a 7" cake ring as a template and a pencil, trace 2 circles on each of the papers, and turn them over (the circles should be close together and visible from the other side, so that the graphite or ink doesn't touch the cake batter. If you want, you can also make miniature rounds in the spaces between the larger circles, for mini cakes).
3. Beat the egg yolks, 2/3 cup (81g) of the confectioner's sugar, and the vanilla in a medium bowl with a mixer on high speed until the mixture is thick, pale yellow and forms a thick ribbon when the beaters are lifted a few inches above the batter, about 3 minutes.
4. In another bowl, using clean beaters, beat the egg whites until soft peaks form. Gradually beat in the remaining 2/3 cup (81g) of confectioner's sugar until the whites form stiff, shiny peaks. Using a large rubber spatula, stir about 1/4 of the beaten whites into the egg yolk mixture, then fold in the remainder, leaving a few wisps of white visible. Combine the flour and salt. Sift half the flour over the eggs, and fold in; repeat with the remaining flour.
5. Line one of the baking sheets with a circle-marked paper. Using a small offset spatula, spread about 1 cup of the batter in an even layer, filling in the traced circles on one baking sheet. Bake on the top rack for 5 minutes, until the cake springs back when pressed gently in the centre and the edges are lightly browned. While this cake bakes, repeat the process on the other baking sheet, placing it on the center rack. When the first cake is done, move the second cake to the top rack. Invert the first cake onto a flat surface and carefully peel off the paper. Slide the cake layer back onto the paper and let stand until cool. Rinse the baking sheet under cold running water to cool, and dry it before lining with another parchment. Continue with the remaining papers and batter to make a total of eight layers (4 baking sheets). Completely cool the layers. Using a 7" cake ring as a template, trim each cake layer into a neat round. (A small serrated knife is best for this task).

Note: The sponge layers can be prepared in advance and stored, interleaved with parchment paper and well-wrapped, in the fridge, overnight. This recipe may make more than 8 layers, depending on the thickness of each layer. Extra layers are useful so you can choose the best-looking one for the caramel topping; most people make this cake with 5-7 layers but a 12+ layer cake would also be pretty darn awesome.

CHOCOLATE BUTTERCREAM
1/2 pound (8 ounces or 227 grams) semi- or bittersweet chocolate, coarsely chopped
1/2 pound (2 sticks or 226 grams) unsalted butter, cut into chunks
1 teaspoon vanilla extract
3 large egg yolks
2 tablespoons confectioners’ sugar

Melt chocolate until smooth. Set aside to cool to room temperature, but of course not so cool that it hardens again. In the bowl of an electric mixer, beat butter until soft and smooth, scraping frequently. Add vanilla and 3 egg yolks. Add sugar and cooled chocolate, beating until thoroughly mixed and scraping as needed.

CARAMEL TOPPING
1/2 cup granulated sugar
1 tablespoon water

Lightly grease a sheet of parchment paper. Place last cake layer on this sheet (if it just came out of the fridge, warm it up a bit in the microwave - you want it to be a little above room temperature so the caramel doesn't solidify upon contact). Cut the cake into 12 equal wedges and reassemble into a circle. Lightly butter the knife and a metal spatula, and set aside. Combine the sugar and water in a small, heavy saucepan and swirl it until the sugar melts and begins to turn a pale amber color. Quickly and carefully, pour this (you’ll have a bit of extra) over the prepared cake layer and spread it evenly with an offset spatula, right over the outer edges. Using prepared knife or cutter, quickly cut layer as you wish. Leave in place, then cool completely. Once fully cooled, cut edges of shapes again, to ensure that you can remove them cleanly.

ASSEMBLING THE DOBOS TORTE
Place a dab of chocolate buttercream on the middle of a 10” cardboard round and top with one cake layer. Spread the layer with about 1/3 cup of the chocolate icing. Repeat with 6 more cake layers. Spread the remaining icing on the sides of the cake (a bench scraper is handy for smoothing out the sides). Optional: press the finely chopped hazelnuts onto the sides of the cake. Propping a hazelnut under each wedge so that it sits at an angle, arrange the wedges on top of the cake in a spoke pattern. If you have any leftover buttercream, you can pipe rosettes under each hazelnut or a large rosette in the centre of the cake.

STORAGE
Refrigerate the cake under a cake dome until the icing is set, about 2 hours. Let slices come to room temperature before serving.

Sunday, August 14, 2011

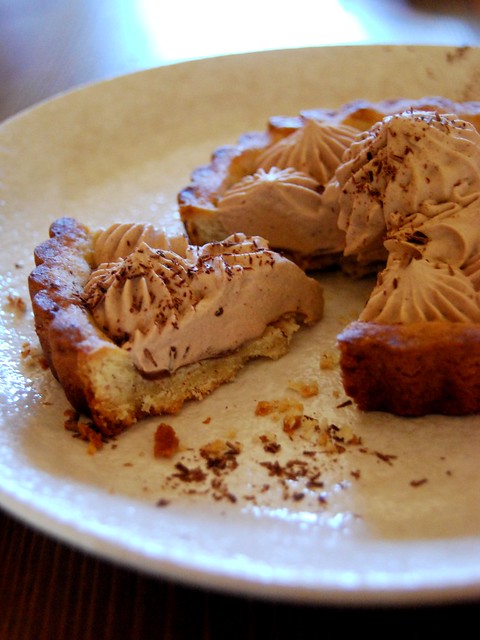
Milky Way Tart and Raspberry Cream Tart

Raspberry cream tart with rum laced pastry cream and caramel-lined almond sugar butter crust. I think I would've preferred a flaky buttery tart shell because it is lighter and more exciting when it shatters in your mouth, but this was deliciously crunchy and buttery too.
The Milky Way Tart is genius. It's supposed to be a thick layer of caramel topped with a billowy, magical layer of whipped milk chocolate ganache. I was too stingy with the caramel, unfortunately. Maybe a little stingy with the cream too. Next time, I would totally use a flaky tart shell, spread at least 1 cm of caramel, and load up on the cream. It would be a dangerous combination.


Milky Way Tart
Adapted from Joanne Chang's Flour: Spectacular Recipes from Boston's Flour Bakery + Cafe

Makes 1 9-inch tart

For the tart shell, use your favorite pie or tart dough recipe, baked off in a 9-inch tart pan with a removable bottom.
For the milk chocolate mousse:

5 ounces milk chocolate, chopped (we used quality milk choco chips)
2 cups (1 pint) heavy cream
1 teaspoon instant espresso powder
1/8 teaspoon kosher salt

For the caramel filling:

3/4 cup granulated sugar
1/3 cup water
1 tablespoon corn syrup
3/4 cup heavy cream
2 tablespoons unsalted butter
1/4 teaspoon kosher salt
2 teaspoons vanilla extract

For the tart assembly:

One baked and cooled 9-inch tart shell (like My Favorite Pie Crust)
3-to 4-inch slab milk chocolate, at warm room temperature, for decorating


Place the chopped chocolate (or chocolate chips) in a medium heatproof bowl.

Gently heat the cream with the espresso powder and salt in a small saucepan over medium heat. As soon as you see bubbles beginning to form around the edges of the pan, remove it from the heat--don't let the cream come to a boil. Pour over the chocolate and let sit for 1 minute. Whisk until smooth. Transfer the mixture to a mixing bowl (I prefer a metal bowl for faster cooling, and poured it straight into the bowl of my standing mixer). Cover the bowl tightly with plastic wrap and place in the refrigerator until very cold, at least 8 hours and up to 3 days ahead. The mixture needs to be extremely cold in order for it to whip properly, so don't skimp on the chilling time. If you are short on time or generally impatient like me, throw the metal bowl into the freezer and give it a good whisking every 5-10 minutes or so--you can complete the chilling this way in about an hour.

To make the caramel, place the sugar, water and corn syrup in a medium saucepan and stir well to combine. Bring the syrup to a boil over medium-high heat and cook until the syrup becomes a deep amber color. Pull the pan from the heat when you see it reaching a deep golden color--it takes only a moment for caramel to go from golden to amber to straight up burnt, so pull it early if in doubt. Stirring constantly with a whisk or heatproof spoon, stir in the cream all at once. Be careful--it will bubble up violently, but keep stirring until the lumps of caramel smooth out once again. Stir in the butter, salt and vanilla. When the caramel is smooth and well-blended, pour it into a small heatproof container and set in the refrigerator to cool and thicken, at least 4 hours or up to 1 week. Again, using a metal container (I use a loaf pan) will cut this time down significantly.

When the cream mixture and caramel have both cooled sufficiently, assemble the tart. Place the tart shell on a serving platter. Spread about three-fourths of the caramel evenly over the bottom of the tart shell. Fit the bowl with the cream mixture onto a stand mixer fitted with the whisk attachment and whip on medium-high speed until stiff peaks form (or beat with a handheld mixer). Mound the chocolate mousse on top of the caramel and smooth evenly.

Using a vegetable peeler, make chocolate curls from the bar of milk chocolate: warm the bar slightly in the palm of your hand before pulling the peeler across it to get curls instead of just grating the chocolate. Drizzle the tart with the remaining caramel and follow it with a generous sprinkling of chocolate curls. Refrigerate the tart for 30 minutes before serving (or airtight for up to 8 hours).

Sunday, July 10, 2011

婷婷姐姐的生日蛋糕!

This is not a pretty cake. In fact, yesterday when Bonnie and I were frosting it with the green tea swiss meringue buttercream, my mom came by and was like "What is that?? It looks like a pie of poop." My placid thoughts quickly turned turbulent as I contemplated questioning my mother about the verdant status of her feces. But she had a point...at that point the cake was just a heap of greenish mutant cream, so I elected to dress it up with some cherries and chocolate and almonds. Ah, much better...who doesn't love poop with cherries on top? If you look closely, you can make out a barely legible hidden message at the top of the cake which I masked in vain with more Scharffen Berger chocolate.
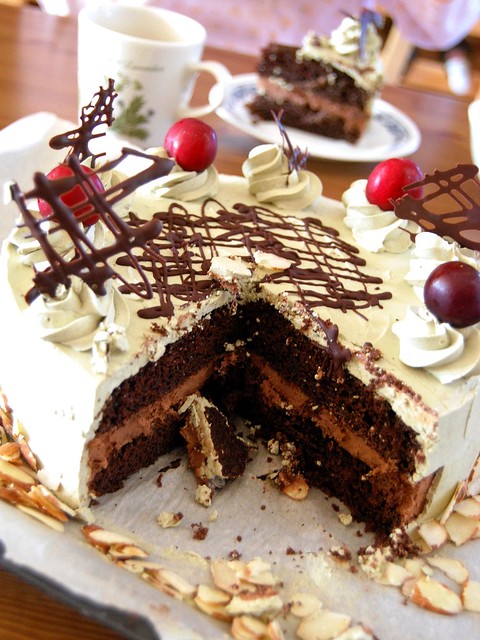
When any picture of food is this messy, it can only mean one thing! Ok maybe two. Either the food was really delicious or the photographer just sucked. In this case I think both apply. But seriously, this cake was phenomenal!! The filling is Martha Stewart's mocha mousse with Scharffen Berger 70% chocolate and instant espresso powder, lightened with old fashioned Clover Farms whipping cream and a pate a bombe made with fat golden organic egg yolks from the farmer's market. The chocolate cake is Ina Garten's ubiquitous chocolate cake. And the frosting is a green swiss meringue buttercream that we couldn't stop licking...

Thursday, June 16, 2011

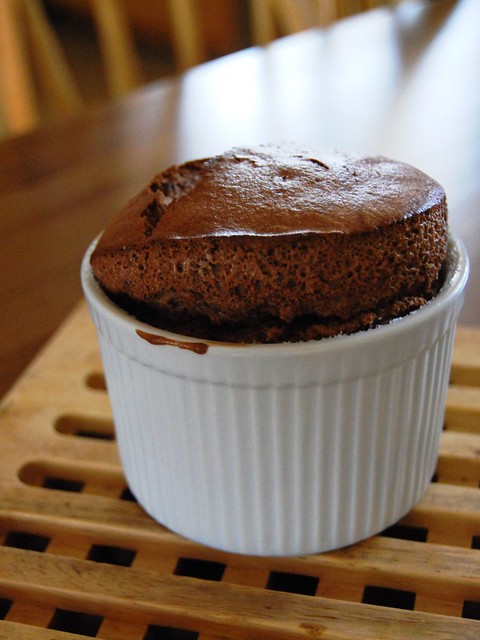
Chocolate Souffle

This chocolate souffle uses 60% dark chocolate, and has no flour or milk! The recipe is from the Dessert Bible by Christopher Kimball. First, chocolate is melted with 2 Tbsp butter, and then orange zest, chocolate liquor, salt, and vanilla are added. Then you beat 3 yolks with 2 Tbsp sugar until very light and thick and fold the two mixtures together. Then you whip 4 egg whites with 1 Tbsp sugar and some cream of tartar, stir a bit of the white into the chocolate mixture, and fold the rest in. Then everything is baked at 385 degrees for 14 minutes in buttered and sugared ramekins.

These were good, but they were a little overbaked (16 minutes was a little long, so next time I would do 14...I think if the middle is molten it's ok! The chocolate flavor will be more intense if it's underbaked) and I thought the orange zest was a little strange, and maybe the chocolate was a tad bitter (try adding more sugar or use a less dark chocolate? like 45%). Didn't have chocolate liquor so I used dark rum.

Sunday, July 11, 2010

3-Ingredient Chocolate Cake


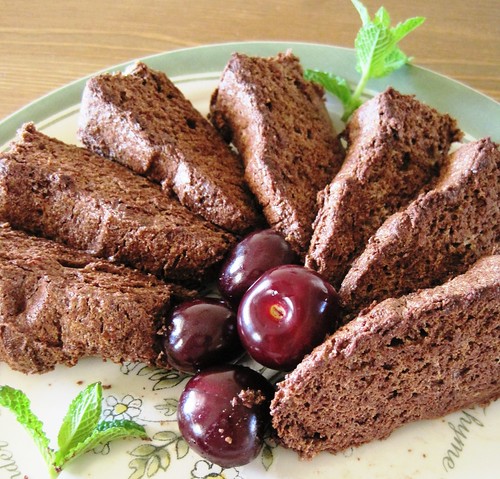
I did not have high hopes for this recipe, which we discovered in The Great Book of Chocolate by David Lebovitz (which is an awesome book, highly recommended). It has three ingredients and not an ounce of fat, but with our recent ice cream craze, we had a ton of egg whites sitting in the fridge begging to be used, to fulfill their lifelong desire to become a delicious dessert.

This cake is not meant to rise a ton because it doesn't have any flour for structure, but it will still be light. It's kinda like a souffle. When I first tried a bite directly out of the oven, I thought it was disgusting - like a paste of fatless bitter chocolate. So we suffocated the cake in plastic wrap and banished it to the fridge, where it spent the next few nights in darkness, accompanied only by some cold apples in the fruit drawer.

One groggy morning while groping around the fridge for some grub, we subconsciously grabbed the chocolate beast and sliced it into thin slices. Topped with some homemade pastry cream, it was amazing! The bitter fatless chocolate perfectly complimented the creamy, rich, vanilla-y silky smooth cream. And surprisingly, the cake was very moist. The intense bitter edge mellowed out as the cake sat in the fridge, and the result was still very chocolately yet not so sour. There are a few criteria for enjoying this cake:

1. You must like dark chocolate, not just milk chocolate.
2. You must have an open mind - don't think "rich chocolate cake." Think "exotic souffle-like dessert!"
3. You must be desperate to get rid of egg whites.
4. You must resist the urge to eat the cake right out of the oven. The chocolate needs time in the fridge to mellow out and for the flavors to blend.
5. You should serve the cake with something creamy, sweet, and vanilla-y. (whipped cream, pastry cream, creme anglaise, mascarpone mousse...you get the idea)

Considering it's so easy to make, and is relatively healthy, and tastes good, we highly recommend you try it.

3-Ingredient Chocolate Cake
3/4 cup cocoa powder
1/2 cup plus 2 Tbsp (135 g) sugar
7 egg whites, room temp

Sift and whisk cocoa and 1/2 cup (100 g) sugar. Whip egg whites gradually with 2 Tbsp sugar until soft peaks. Fold the two together gently in 3 batches. Bake in a 9-inch springform pan with pan of warm water on the rack below (or do a waterbath with a pan that doesn't leak). Bake 35 minutes. Cool 5 minutes, remove from pan, and cool completely. Wrap in two layers of plastic wrap and stick it in the fridge overnight (for best flavor, 36 hours).

Thursday, January 7, 2010

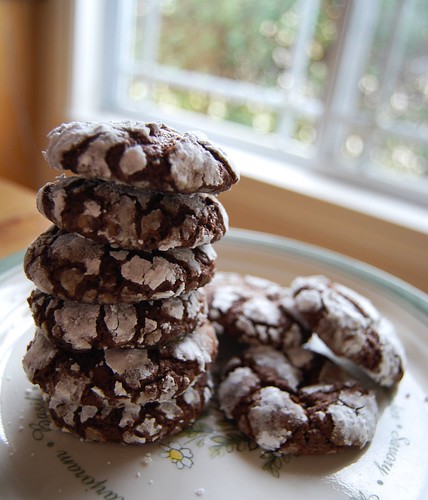
Choclate-espresso Snowcaps


Chocolate-espresso Snowcaps (recipe courtesy Martha Stewart)

Makes 18.
1/2 cup all-purpose flour
1/4 cup unsweetened cocoa powder
4 teaspoons instant espresso
1 teaspoon baking powder
1/8 teaspoon salt
4 tablespoons unsalted butter, room temperature
2/3 cup packed light-brown sugar
1 large egg
4 ounces bittersweet or semisweet chocolate, melted and cooled
1 tablespoon milk
1/2 cup confectioners sugar, for coating

In a medium bowl, whisk together flour, cocoa, espresso, baking powder, and salt. With an electric mixer, beat butter and brown sugar until light and fluffy. Beat in egg until well combined; mix in cooled chocolate. With mixer on low speed, gradually add dry ingredients; beat in milk just until combined. Flatten dough into a disk; wrap in plastic. Freeze until firm, about 45 minutes.

Preheat oven to 350 degrees. Line two baking sheets with parchment paper. Shape dough into 1-inch balls. Place confectioners' sugar into a medium bowl; working in batches, roll balls in sugar twice.

Place balls on prepared baking sheets, 2 inches apart. Bake, rotating sheets halfway through, until cookies have spread and coating is cracked, 12 to 14 minutes; cookies will still be soft to the touch. Transfer to a wire rack to cool completely.

Wednesday, January 6, 2010

Whole Wheat Walnut Cranberry Brownies


I thought it would be pretty cool to be able to have brownies for breakfast. With 2/3 cup of whole wheat and not as much sugar as most brownie recipes, these are healthy and delicious, not bad for a morning meal. Recipe courtesy MadeHealthier.com, with cranberries and extra walnuts added.

Whole Wheat Walnut Cranberry Brownies

2/3 cup whole wheat flour
1/3 cup all purpose flour
2/3 cup sugar
1/4 cup unsweetened cocoa powder
1 tsp baking powder
1/2 tsp salt
1/3 cup vegetable oil
1/2 cup 1% milk
1/4 cup water
2 eggs
1/2 tsp vanilla extract
1/4 cup semisweet chocolate chips
1 cup walnuts, chopped
3/4 cup dried cranberries

In a large bowl, combine the flour, sugar, cocoa powder, baking powder, and salt. In a separate bowl combine the oil, milk, water, eggs, and vanilla. Now mix everything together including the chocolate chips and walnuts, be careful that you don’t over mix.

Pour the brownie batter into an 8×8 nonstick pan. Drop in a few more chopped walnuts on the top and bake at 350 degrees F for about 30 minutes. Use a toothpick in the middle of the pan to check if it is done. Enjoy!

Sunday, January 3, 2010

Chocolate Cranberry Spice Cookies


Adapted from Tish Boyle's chocolate cranberry spice cookies (The Good Cookie). Part of the reason for making these was to dispose of the rest of our "mascarpone butter" that resulted from overbeating that finicky mascarpone cheese.

Chocolate Cranberry Spice Cookies
1.5 cups all-purpose flour
6 tbsp Dutch-processed cocoa powder
1/4 tsp baking soda
1 tsp ground cinnamon
1/4 tsp ground nutmeg
1/8 tsp ground cardamom (original recipe used cloves)
pinch of salt
1 stick unsalted butter, softened
1/2 cup mascarpone butter (from overbeaten mascarpone cheese)
3/4 packed light brown sugar
1/2 cup granulated sugar
2 large eggs
1 tbsp vanilla extract
3/4 cup dried cranberries
1.5 cups coarsely chopped walnuts, plus 20-30 whole walnuts for pressing into tops of cookies

1. Sift the flour, cocoa powder, baking soda, spices, and salt in a medium bowl and set aside.

2. Use a hand mixer to beat butter and sugars at medium speed until light, about 2 minutes. Add eggs one at a time, beating well after each egg. Beat in vanilla extract. Use a fork to add dry ingredients in three additions, mixing until just combined. Stir in cranberries and walnuts. Cover the bowl with plastic wrap and refrigerate the dough for an hour.

3. Position a rack in the center of the oven and preheat the oven to 350 degrees. Line two baking sheets with foil.

4. Use an ice cream scoop to drop dollops of cookie dough on sheets (12 per sheet). Bake for 15 minutes or until just set but still soft.