Pages

Sunday, July 31, 2011

Lemon Chiffon

My aunt, who is visiting from China, doesn't like sweet desserts. So I thought I would make a cake that tempered sweetness on multiple fronts. This is a lemon chiffon cake filled with nectarine whipped cream and frosted with cream cheese creme fraiche whipped cream, topped with yellow and white nectarine compote.

I overdosed on lemon zest in the cake and reduced the sugar by 30%. The peach compote also has just a sneeze of sugar. And the tang of the cream cheese and creme fraiche also help combat the sweetness, in theory.
My aunt took one bite and said, "太甜了!" (too sweet!!) I thought, "不会吧!" no way! Was it really that sweet? I had to try another slice. And maybe another. This was for the sake of research, you know. I wanted to make a cake that she would like...and I was curious just how much you could reduce the sugar in a cake before it became inedible. So I made another lemon chiffon cake and used only 60 g of sugar! That's like, 4 measly tablespoons. For a whole 7-inch cake. That's a reduction of 50-70% from most recipes. I thought, this cake will probably be disgusting, but my curiosity got the better of me.

It turned out okay! In fact, I might've overdosed on salt just a smidgeon...haha. But the cake was ever so delicately sweet and delightfully lemony and feather soft. I also didn't put vanilla extract because my aunt can detect that and doesn't like it. Nevertheless, the cake was very flavorful from the lemon zest and juice. The verdict? "还是太甜了!" still too sweet. I think she's getting 蛋糕 (cake) confused with 馒头(steamed bun). Oh well...I guess I'll just have to eat these three cakes solo. Thank you, your sympathy is greatly appreciated.

Saturday, July 30, 2011

Loofah and Egg / Belt Fish

This green veggie is called (thank you googletranslate) Loofah. Whoever named it was a genius. The story behind this dish...you see those eggs? I usually put about 2 eggs. This time there were 4 whites and 5 yolks and maybe a little too much oil. I was making a lemon chiffon cake and accidentally dumped the oil into the egg whites instead of the yolks. I was in shock for about 30 seconds. Then I had the brilliant idea of stir-frying the eggs with loofah! Before cooking, I poured the oily eggs into a tall narrow glass and mopped off the oil with paper towels and a spoon (I'm a genius, I know). And don't worry about the chiffon...it was made alright. The egg carton is just a little empty now.

Loofah and egg go together like crazy. Let me just say, the eggs were delicious! They were just beaten with 1/6 tsp kosher salt and fried til golden, and flavored with a splash of soy sauce. Loofah is incredibly bland unless you add garlic, egg, and the right amount of salt. Then it's amazingly sweet! And even better with a crackling of numbing saliva-inducing Sichuan peppercorn. I have to admit...I cheated and added homemade chicken broth while cooking the loofah...shhhh don't deflate their self esteem!

This fish is called belt fish. Whoever named it needs to talk to whoever named the Loofah. It is caramelized with ginger infused soy sauce, caramel, Shaoxing wine, and black vinegar. The crusty, caramel sweet skin is the best part!

Saturday, July 23, 2011

Oxtail Soup...Again

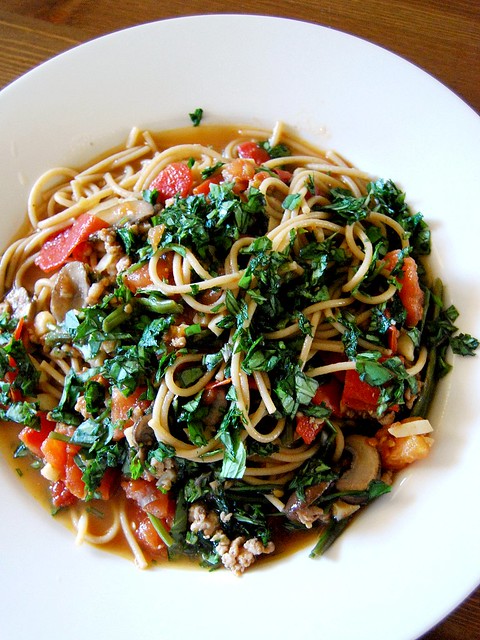
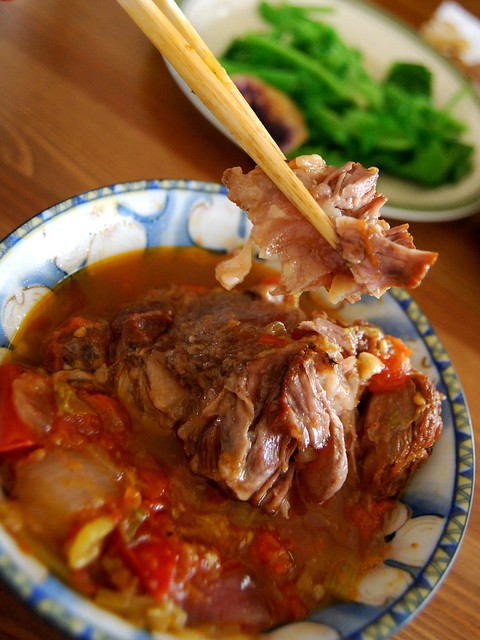
Is this bowl finished? Are you crazy? That little morsel right there. Yes, it's making eyes at you. That's the secret hideout for the Yum Yums. Shhh they don't know you're here. You're supposed to pick it up and coax the juices out from deep within the bone. All the tomato-y beefy goodness...
The worst part about making and eating oxtail soup is getting to the bottom of the bowl. So this time...we'll turn back time!
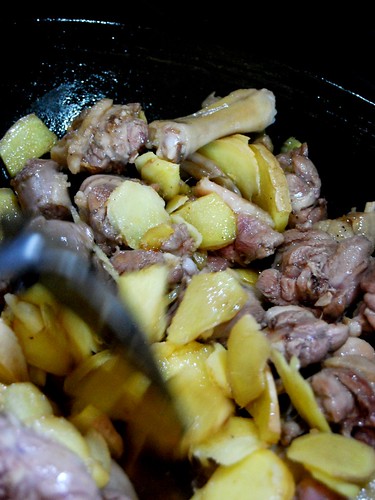
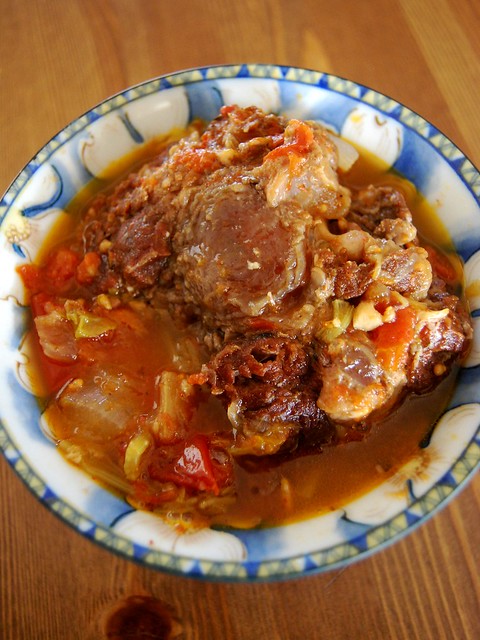
Perfectly tender and fall-off-the-bone good. But not completely disintegrated. That's important - we don't want to eat the Gerber's version of oxtail soup. Wouldn't that be awesome if Gerber made oxtail soup in babyfood form? Those poor babies...I guess privileges do come with getting teeth.
Do you see the slight crusty brown coloration of the meat that is staring you in the face? That, my friend, is flavor. The result of a good sear before braising!
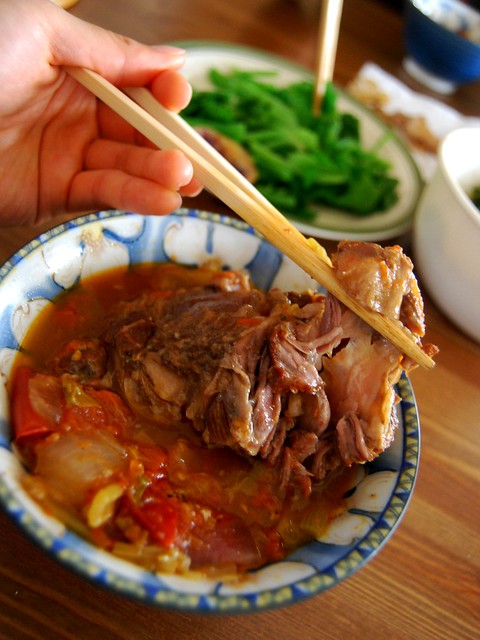
The biggest bones are the best. So many nooks and crannies and tendons and ligaments and deliciously meltingly tender collagen...sorry, too much anatomy huh. Excuse my enthusiasm; you had to be there to understand.
I don't think these photos are really in any logical order. But no matter. If that meat doesn't look tender, you can just leave right now. I need some private time with my soup anyway.
Do you know how much self control it took to take all those pictures? Thank you, I know I just outdo myself every time. And because I'm so nice...I'll even share with you the top secret recipe.

Before I do, I have a funny story. At the supermarket, while I was gawking at the oxtail, this nice elderly man (who didn't really speak English) and his granddaughter were next to me and he goes, "Oh, what is that?"
Me: "Oh, this is oxtail."
Him: "Huh?"
Me: "It's the tail, you know..."
Him: "Oh! The neck?"
Me: "No no, the tail, in the back..."
Him: "Ohhh."

I guess cows have gotten a little larger since his days.

Oxtail Soup...Again
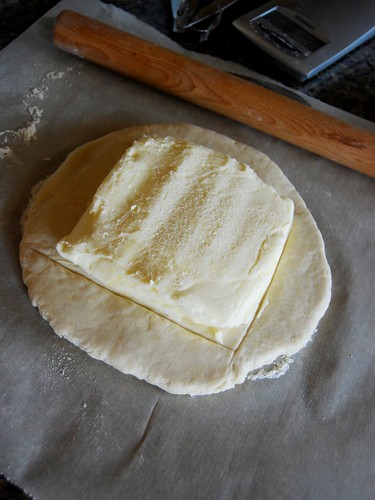
This makes a relatively small serving. I would say it serves 3 people - with a maximum of two people who like to eat meat. The third person must be content with not having a large oxtail piece. Double it for larger company! The keys to this recipe are that the oxtail and veggies must be seasoned with a healthy single layer of sea salt, and the oxtail must be seared on high heat almost to the point of burning. Also, the tomatoes must be ripe and sweet or the broth will be too sour and watery; if you cut open your tomatoes and they are whitish instead of completely dark red inside, add tomato paste or sugar to the broth. Don't be scared by the 2 bulbs of garlic; they are imperative for flavor and the long braise just makes them meltingly sweet and mellow. The purple onion and garlic added in the beginning and end ensure complex flavor development throughout the braise as well as intense sweetness of shorter-cooked onion and garlic. The beauty of this recipe is its simplicity - no need to add beef stock, chicken bouillon, bouquet garni, flour, etc. There's a lot of oil in the end, so be sure to skim it off, or you will suffer a very unpleasant oily mouthfeel when you drink the soup. And trust me, you'll want second servings of the lovely beefy, sweetly concentrated tomato soup.

Oxtail - 2 HUGE bones, 3 medium ones, 1 tiny one
Sea salt or kosher salt
2 Tbsp oil
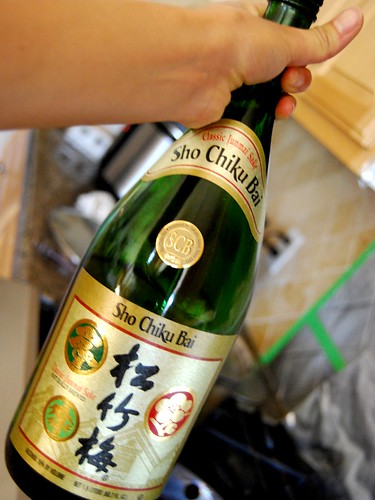
3/4 cup Shaoxing wine
2 bulbs of garlic, one bulb minced and the other bulb peeled
1 large carrot, sliced on a diagonal into 1-inch pieces
2 celery stalks, sliced into 1-inch pieces
1 large fresh organic red onion, sliced into 1-inch pieces
1 1-inch piece of fresh, good quality ginger, peeled and sliced
4 large ripe tomatoes, 1 ripe roma tomato, 8 ping-pong ball sized ripe sweet tomatoes
1 cup of purple sweet potatoes, cut into large chunks

Prepare the meat: Take it out of the fridge, dry very well with paper towel, and sprinkle one layer of sea salt on one side. Let it rest at room temperature for 15-20 minutes to take off the chill to promote better searing.

Sear the meat: Heat a medium soup pot over high heat 2 minutes until hot. Add 2Tbsp oil and swirl, heating until oil starts to ripple. Add meat in a single layer, salt side down. Sprinkle the other side with salt, put the lid on, and let it sear for 2-3 minutes until you get a very dark brown crust (This is the flavor concentration! Make sure to get that dark brown crust). Turn the meat and sear very well on all sides, replacing the lid each time, unless you want to smell like a piece of seared meat.

Deglaze the pan: Remove the perfectly seared meat and set on a clean plate. The pot will be very hot at this point, and the yum-yums at the bottom may be threatening to burn. Turn the heat down to medium and add the 3/4 cup wine all at once, scraping the bottom of the pan to remove the yum yums. Pour this delicious liquid into a small heatproof bowl and set aside. Don't you dare let anything dangerous get near it.

Brown the veggies: Turn the heat once more up to high. Your pot should be pretty clean right now. Add 2 Tbsp more oil and swirl to coat. When oil is hot, add the finely chopped garlic, ginger, carrot, celery, and HALF of the onions to the pot. Sprinkle with an even layer of sea salt and toss the veggies to coat evenly with salt and oil. Cover with a lid and allow to cook for 5-7 minutes, until slightly softened.

Simmer down the tomatoes: Add the tomatoes and smash them with the back of a spatula, mixing them with the veggies in the pot. Replace the lid and continue cooking on high for 5-7 minutes until the mixture is boiling and the tomatoes are releasing liquid.

Replace the meat and simmer for a long time: Add oxtail back into the liquid, pushing them all the way to the bottom of the pot and covering every piece with the liquid. Turn the heat down to low, cover with a lid, and maintain a gentle but even simmer for 3 hours.

Add additional veggies and adjust salt: Toss in the remaining garlic cloves, onions, and sweet potato and push them into the soup. Taste the soup and add more salt if needed. Simmer for 45 more minutes.

Skim off the oil and swallow your saliva: Using an oil skimmer or a very flat wok spatula, take off the top layer of red orange oil to a wide shallow bowl. Be patient - this may take 20-30 spatula-fulls. Press down on the tomatoes to coax the oil to the top of the soup. Continue until you don't see too much red oil on top. Pour the oil mixture into a glass measure cup and gawk at the layer of fat that rises to the top. Cover with plastic wrap, and allow to cool at room temp before putting it in the fridge (use it to braise ox tendon later!). Help yourself to a big piece of oxtail and savor every second.

The Passionfruit-wannabe-chiffon

Passionfruit is impossible to find. I called Whole Foods, and after being transferred to three different departments, I was told that it is out of season. My call to Lucky's was unlucky. I checked all over the sketchy Asian supermarkets. No success, except for one bottle on the bottom shelf of the Pandan extract aisle - I couldn't really decipher the strange characters on the bottle but there was a picture of the elusive little devil on the label! I was tempted to scrawl WANTED under its mug shot, as I used every drop of my nonexistent self-control to stave off an impending heart attack. Upon closer inspection, I noticed some unwanted suspects on the ingredients label: sugar, sodium benzoate, and yellow something. Poisonous!

But wait! Isn't passionfruit just an addictive combination of tropical flavors?? It has the floral buttery aroma of jackfruit, the vanilla notes of a banana, the tangy intoxicating sweetness of pineapple, and the tang of a bright yellow lemon. Okay I know, wishful thinking...But in my humble opinion, this chiffon cake was phenomenal. Take that, passionfruit!

I baked it in a pan too big for the batter, so it didn't rise to such an impressive height. Next time, I'm using the 7-inch tube pan. Oh yes, there will be a next time!

Banana Jackfruit Pineapple Lemon Chiffon (aka Passionfruit-wannabe-chiffon!)
1 cup (120g) Cake flour
1/3 cup (70g) Fine sugar (Grind white sugar in a food processor or Magic Bullet)
1 tsp Baking powder
Scant ½ tsp Salt
¼ cup Oil
¼ cup (4) Yolks
½ cup Magnificent Tropical Mush: (perfectly pureed pineapple, jackfruit, and banana, and the juice of half a lemon – use a food processor)
½ tsp Pure Vanilla extract
¼ tsp Cream of tartar
½ cup (4) Egg whites

1. Preheat oven to 350*.
2. Sift flour, baking powder, 1/3 of the sugar, and salt into a mixing bowl.
3. Whisk together oil and yolks. Mix in the flour until it forms a smooth paste. Add the mush and whisk until smooth.
4. Add cream of tartar to egg whites in a large mixing bowl.
5. Beat until white, gradually add remaining sugar, and beat until stiff peaks form.
6. In 3 additions, gently fold egg whites into the flour mixture just until no streaks remain.
7. Pour into an ungreased 7-inch tube pan and smooth the top. Bake 27-30 min until a tester comes out clean and dry. No peeking!
8. When cake is completely cool, remove from pan (it’s okay, I couldn’t wait either...who obeys this step anyway?).

Jackfruit Chiffon Cake

Jackfruit - how do you describe it? I think it kind of tastes like Juicyfruit bubblegum. Or a blend of banana, pineapple, and mango. The fruit itself is gigantic. I mean huge. Like, ridiculously big. And spiky. I think it's delicious, and I'm never wrong. Except when I'm not right. But that doesn't happen.
This chiffon cake is to die for! I tried one bite. It was okay. I tried another. Oh, it's good. I tried a third...and then I lost count. I realized that you have to savor it slowly because the layers of flavor unravel on your tongue. First you're hit with the sweet aroma of jackfruit, and then the delicious flavor of a perfectly tender eggy chiffon comes forth (You don't like eggy chiffon? That is just too bad. Allow me to do you a favor and eat your piece). It's almost buttery...which is weird because it has no butter. Pure magic, my good friend.

Next time, I will reduce the sugar a smidgeon. It was a little too sweet, but I prefer less sweet cakes so this is good for most people.

Jackfruit Chiffon
1 1/4 cup (150g) Cake flour
1/2 cup (130g) Fine sugar (Grind white sugar in a food processor or Magic Bullet)
1 tsp Baking powder
Scant ½ tsp Salt
¼ cup Oil
¼ cup (4) Yolks
½ cup Jackfruit puree + juice of half of a lemon
½ tsp Pure Vanilla extract
¼ tsp Cream of tartar
½ cup (4) Egg whites

1. Preheat oven to 350*.
2. Sift flour, baking powder, 1/3 of the sugar, and salt into a mixing bowl.
3. Whisk together oil and yolks. Mix in the flour until it forms a smooth paste. Add the mush and whisk until smooth.
4. Add cream of tartar to egg whites in a large mixing bowl.
5. Beat until white, gradually add remaining sugar, and beat until stiff peaks form.
6. In 3 additions, gently fold egg whites into the flour mixture just until no streaks remain.
7. Pour into an ungreased 7-inch tube pan and smooth the top. Bake 27-30 min until a tester comes out clean and dry. No peeking!
8. When cake is completely cool, remove from pan (it’s okay, I couldn’t wait either...who obeys this step anyway?).

Thursday, July 21, 2011

Adaptable Bran Muffins


Before trying these, you are not allowed to know what's in them. Oh what's that I see making a run for it? If my eyes don't deceive me...I believe it's your...starts with an "a" and ends with a "ppetite." Now now, come back here! Don't these look absolutely scrumptious? If you insist, I shall be perfectly honest and label them as Wheat-bran-black-bean-sweet-liquid-pureed-red-bean-millet-flax-banana muffins. They only contain 3 Tbsp (count them!) of oil and are perfectly tender, moist, and flavorful. The best part? You can customize them to your liking.

The story behind these gorgeous babies. My mom was cleaning out the fridge and was like, "Can you make something using these ingredients?" She slapped on the counter the liquid she used to cook sweet black beans and a bowl of plain mushy red beans whose future looked hopeless. Recently she's been crazy about millet, so she suggested putting them in muffins. I thought about using the black bean liquid to make a chiffon cake, but that wouldn't take care of everything else. I then turned to the trusty "Bran Poop Muffins" recipe and adapted it. The key to any bran muffin is to include a healthy dose of white flour - I know, you're tempted to use whole wheat, and that's perfectly fine if you intention is instead to make dense weapons to pelt at burglars. A second important point - you need to have some oil. Otherwise they will be gummy. Finally, toasted bran is a must. Unless you are a horse and like the taste of hay.

You can add any 1/2 cup of grain and 2.25 cups of mush. For this mush, I used 1 cup of sweetened kuromame (black bean) cooking liquid, 1.5 cups of mashed cooked unsweetened red beans, and 3/4 of a banana, and didn't add extra sugar (but it was delicious!). Be sure to adjust the sweetness to your liking. For instance, if you use unsweetened applesauce or pumpkin puree, you may need to add the brown sugar; for these, no additional sugar was necessary because the bean cooking liquid was sweetened already, and the banana added extra sweetness.

Adaptable Bran Muffins
1 1/2 cup (90g) wheat bran
1/2 cup grain (cornmeal, millet, oat bran, etc!)
2.25 cup mush (mashed banana, pureed soaked raisins, grape juice concentrate, pureed sweet black bean cooking liquid and unsweetened red beans, applesauce, a combination, etc)
1/2 cup (120g) plain low-fat yogurt
1/4 cup (50g) packed light brown sugar (If you mush is not sweet enough)
3 Tbsp vegetable oil (canola works well)
2 eggs
3/4 cup (100g) all purpose flour
3 Tbsp flax seed powder
1 teaspoon baking powder
1 ½ teaspoon baking soda
1/2 teaspoon salt
chopped walnuts, flax seeds, millet, etc (for sprinkling on top)

1. Preheat the oven to 400F. Line a 12-cup muffin tin with paper liners or spray with nonstick spray.
2. Spread the wheat bran on a baking sheet and toast in the oven for six to eight minutes, stirring every 3 minutes so it cooks evenly. Be careful not to let the bran burn; remove bran after you smell a lovely toasted aroma. Let cool for 5 minutes.
3. While the bran is toasting, prepare your mush.
4. In a large bowl, mix together the toasted bran, yogurt, mush and brown sugar, if using.
5. Stir in the oil and eggs.
6. Mix together the flours, baking powder, baking soda, and salt, and pour into wet ingredients. Stir gently with rubber spatula until the ingredients are just combined.
7. Spoon the batter into the muffin tins, filling the tins all the way but not mounding the batter (batter may overflow onto oven floor and burn). Because muffin tins can vary in size, don’t try to make exactly 12 muffins; just fill the tins to the top. Sprinkle the tops with chopped walnuts, millet, sesame seeds, flax seeds, etc.
8. Bake for 21-25 minutes, or until a toothpick inserted in one of the middle muffins comes out clean (a few tiny dry crumbs are okay, but no mushy stuff). Cool 5 min in the pan, and then cool completely on a rack to room temperature. Enjoy with whole milk or vanilla soymilk!

Sunday, July 10, 2011

婷婷姐姐的生日蛋糕!

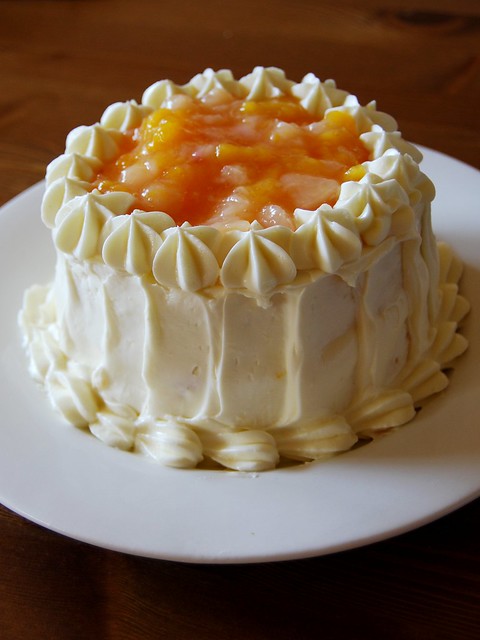
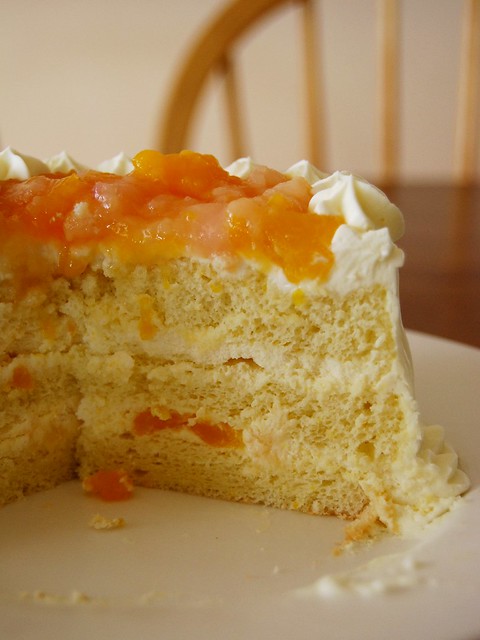
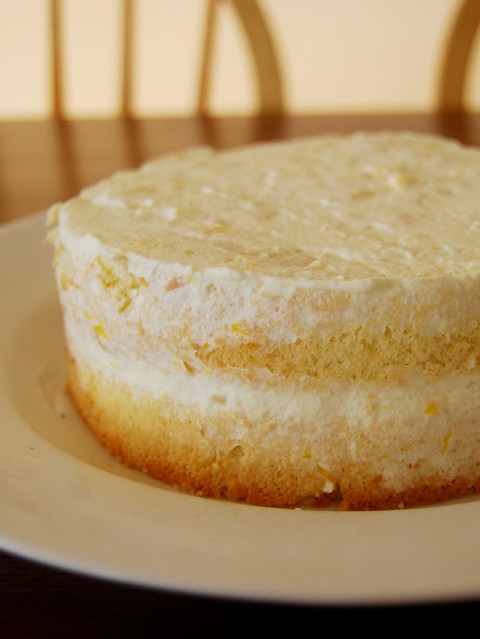
This is not a pretty cake. In fact, yesterday when Bonnie and I were frosting it with the green tea swiss meringue buttercream, my mom came by and was like "What is that?? It looks like a pie of poop." My placid thoughts quickly turned turbulent as I contemplated questioning my mother about the verdant status of her feces. But she had a point...at that point the cake was just a heap of greenish mutant cream, so I elected to dress it up with some cherries and chocolate and almonds. Ah, much better...who doesn't love poop with cherries on top? If you look closely, you can make out a barely legible hidden message at the top of the cake which I masked in vain with more Scharffen Berger chocolate.
When any picture of food is this messy, it can only mean one thing! Ok maybe two. Either the food was really delicious or the photographer just sucked. In this case I think both apply. But seriously, this cake was phenomenal!! The filling is Martha Stewart's mocha mousse with Scharffen Berger 70% chocolate and instant espresso powder, lightened with old fashioned Clover Farms whipping cream and a pate a bombe made with fat golden organic egg yolks from the farmer's market. The chocolate cake is Ina Garten's ubiquitous chocolate cake. And the frosting is a green swiss meringue buttercream that we couldn't stop licking...

Monday, July 4, 2011

Basil, Tomato, Mushroom Pasta

With lots of garlic and basil!

We had leftover kong xin cai and mushroom stir fry, which were delicious in the pasta! The following recipe may be a little specific, but you can customize it to your liking. We used whole wheat noodles and didn't add cheese so it's low fat and high in fiber, but it would taste better with unhealthy white pasta and lots of creamy delicious cheese!!

Basil, Tomato, Mushroom Pasta
4 servings of noodles
3 Tbsp olive oil
1 head of garlic
1/2 cup ground pork
1/2 tsp salt
1 tsp better than bouillon (optional)
4 fat organic tomatoes
leftover sauteed mushrooms and kong xin cai (hollow center veggie)
a fat handful of basil leaves, cut finely
cracked black pepper

1. Bring a large pot of boiling water to a generous salt. Add noodles and stir. Cook until al dente, drain but do not rinse off the starchy goodness.
2. Meanwhile, heat a wok over high and add olive oil. When oil is ot, add garlic and pork and salt, and stir fry until the pork starts to brown and the garlic smells fragrant.
3. Add tomatoes and bouillon. Bring to a boil over high heat and smash tomatoes to let them release juice. Add your leftover mushrooms and kong xin cai.
4. When everything is heated through and smelling delicious, add the noodles and stir. Toss in basil leaves and give everything a good stir, and divide into bowls. Serve with freshly cracked black pepper.

a bushy bunch of basil

Saturday, July 2, 2011

Gateau St Honore

This evil little puppy. Whoever came up with it was up to no good. The Gateau Saint Honore is made of a puff pastry base, a ring of choux pastry encircling a filling of silky light chiboust cream (meringue lightened pastry cream), accented with cream puffs dipped in caramel and garnished with a generous swirl of chantily cream. What's that? Not enough cream? Oh let's be friends. :D
For the puff pastry base, measure the butter square, roll out the flaps (this was so much fun!) and tuck that butter baby in nice and snug. Don't get too attached. You'll be smashing and rolling it and sticking it in the cold fridge.
Fold like a business letter, chill 40 minutes, repeat 5 more times for traditional puff pastry and only 3 more times for this cake! What a deal. I opted to make miniature cakes so I cut them little circles. See that middle photo right below? That's the culprit...the hot caramel that is responsible for the fat blister on someone's left thumb! Actually the thumb's owner's own stupidity is to blame.

To make puff pastry, you need two things which I lacked. One, the ability to roll dough into shapes that don't resemble amoebas. Two, the patience of a saint. The dough needs to rest for 40 minutes after each turn (there are six turns! can't even count them on one hand) to let the gluten relax and the butter rechill so it doesn't melt and stick the precious layers together. I was on my 5th or 6th turn...forgot to do the indentation dough thing to keep track, and I checked another recipe from the Pastry Bible (not the recipe I was using, but I was just curious) and to my elation it said that you only need 4 turns for the St Honore because the base of the cake doesn't need all 1000 or so layers of traditional puff pastry. Me and that book became friends real fast.
The spun sugar was actually really easy to make. I watched a few youtube videos of some really pro people making spun sugar, and then got sidetracked and found myself gawking at old Asian ladies making dragons and phoenixes and stuff out of caramel. Amazing! But being the overachiever I am, I made something even better. The phoenix's maison. What did you say? Oh please, don't inflate my ego.
Hear that? It's the puff pastry calling your name. Needless to say, the seductively dripping chiboust cream is intentional.


I used a combination of the recipe from Tartelette's beautiful blog and the one from the Pastry Bible. My ring of choux pastry on top of the puff pastry was definitely too fat, and unfairly cheated me out of my precious chiboust cream filling. Also the three cream puffs on this cake are the only three presentable ones from the batch - the others were either the size of grapes or the shape of oversized lumpy popcorn. My piping skills never fail to amaze me. To be honest, I really only cared for the chiboust cream! I could just live on that stuff. Next time I'll just make a vat of chiboust cream and dine in heaven. Since it'd be sans the butter-laden puff pastry, it would be figure friendly too...

Friday, July 1, 2011

姜母鸭 - Ginger Mom Duck


If you love ginger and duck, this dish is to die for. If you love your mom, it's even better. In Chinese, the name refers to the mother root of the ginger plant, the central root from which arise the baby roots. Cute huh?

Getting happy. Look at all that ginger! Two cups!
This is the wine we used. It was good, but my mom kept insisting that beer would be better. Alas, we had none on hand. My mom then proceeded to sing the praises of the above brand of sesame oil after we liberally dumped it into the wok.

mom: "This brand is really really good! Oh." pause.
me: "What?"
mom: "It expired last year."

The integral component to this dish's success. Shhhh...they'll all be doing it...

Jiang Mu Ya – Ginger Mom Duck

The legs, thighs, and wings from one duck (or 1.5 lb assorted cuts)

2 Tbsp Shaoxing Wine

a few turns of freshly ground Szechuan peppercorn

½ tsp kosher salt

1 cup pickled ginger, sliced ¼ inch thick

1 cup fresh ginger, sliced ¼ inch thick

½ cup sesame oil

3 Tbsp sugar

1/3 cup soy sauce

1 cup sake or beer or Shaoxing Wine

3 carrots, roughly chopped

Additional add-ins (listed in order from lengthy to short cooking times): frozen dried chestnuts, peanuts, sweet potatoes, shiitake, seaweed, kabocha, nagaimo

Chop duck into bite size pieces, being careful not to splatter duck guts all over the place. Marinate the duck with 2 Tbsp Shaoxing Wine, a few turns of freshly ground Szechuan peppercorn, and ½ tsp kosher salt for 15 minutes while you prepare your ginger and veggies. Heat the sesame oil in a wok over high heat, and add all of the ginger slices and stir fry briefly. Throw the duck on top, add the lid, and cook undisturbed for 5 minutes to brown the duck. Stir the contents around, and brown the other sides. Add the 3 Tbsp sugar to the bubbling liquid and let it caramelize for a minute. Then add the 1/3 cup soy sauce, tian jiang (if using), and enough sake or beer to barely cover. Add carrots and chestnuts (and any other tough cooking veggies) and transfer to pressure cooker, and cook on high for 30 minutes. If you don’t have a pressure cooker, just add the lid and maintain a rapid simmer for 45 minutes. Remove from pressure cooker and transfer to a heavy pot, and add any additional add-ins depending on how long they need to cook (most take about 30 minutes). When almost done, take off the lid and let the liquid boil off to concentrate the yum yums, about 30 minutes. Taste and add salt and pepper to your liking.

Cook’s Notes

- If you only have fresh ginger, you can just use 2 cups fresh ginger and skip the pickled stuff.

- Make your own pickled ginger by marinating

- For the add-ins, feel free to get creative! Just try to pick stuff that holds up to stewing and doesn’t release too much liquid (such as leafy greens)