Pages

Thursday, December 29, 2011

Carrot Cake with Mascarpone Frosting


Carrot cake is a classic. You mess with carrot cake, you go to jail.

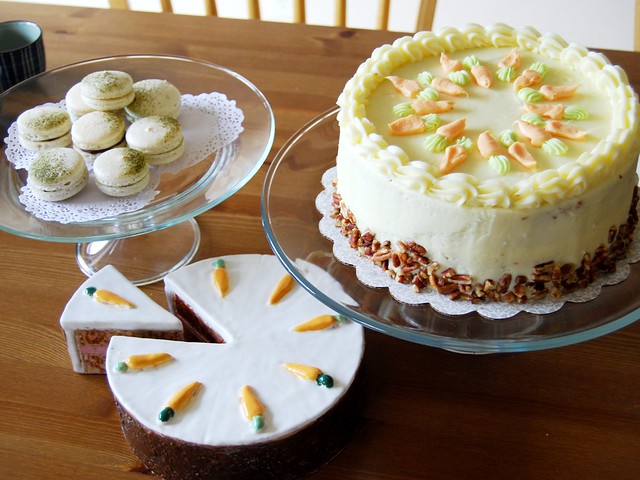
Woahhhh Nelly, hold your horses! (neigghhhh...!) Hate to break it to ya but you're wrong! You CAN mess, but you gotta do it legitly. Every legit carrot cake needs to have real carrots, walnuts or pecans (we used both because we couldn't decide), cream cheese frosting, and those cheesy little carrots piped around the top. Whether or not you throw in crushed pineapple, coconut, cinnamon, nutmeg, allspice, buttermilk, chopped ginger or raisins is up to you, and will allow you to determine who your real friends are.

We adapted this beauty from Sam's famous carrot cake on Allrecipes, and paired it with mascarpone cream cheese frosting. The mascarpone balances the tang of the cream cheese and adds a nutty sweetness. We don't like tooth-achingly sweet frosting. Paula once put SIX cups of powdered sugar to one stick of butter and one 8-oz brick of cream cheese. Don't know about y'all, but we ain't wearin' dentures/have Deen Family Sugar Tolerance. So we reduced the sugar in both the cake and the frosting, and it's still plenty sweet and scrumptious.

Sam told us to use 8 oz of crushed pineapple with juice, but we think that the juice made the cake a little too sticky; we wanted a fluffier, lighter cake, so we suggest draining the pineapple of excess juice. Also, we substituted some of the white sugar for brown sugar, but this may have also made the cake slightly denser and moister (akin to a sticky toffee date pudding, which some may prefer); maybe all white sugar is the way to go. Also, let the cake cool completely before wrapping in plastic wrap to prevent condensation. We think raisins don't go with carrot cake as well as crystallized ginger does - ginger just fits so well in the cinnamon, allspice, and nutmeg clique. But if you're not a ginger fan, fret not, we're sure you'll find other friends. In the meantime, make this cake!

Revised and Tested Recipe - the World's Best Carrot Cake
THIS CARROT CAKE IS DELICIOUSLY FRAGRANT AND MOIST thanks to the combination fo buttermilk, flaked coconut, and crushed pineapple. It is also not too sweet because we reduced the sugar from 2 cups to 1 ¼ cup and swapped out raisins for crystalized ginger, which perfectly matches the spiced cake. It contains less oil than most carrot cake recipes, allowing the delicate flavor of the carrots to shine and results in a cake that isn’t too greasy. The mascarpone adds a natural sweetness and lends complexity to an otherwise traditional cream cheese buttercream that is essential to carrot cake.

For the cake:
2 cups + 2 Tbsp all-purpose flour (270 g)
1 ¾ teaspoons baking soda
½ teaspoon baking powder
1/4 teaspoon table salt
2 teaspoons ground cinnamon
1/4 tsp nutmeg (optional)
1/8 tsp allspice (optional)
3 large eggs (room temp)
3/4 cup low-fat buttermilk (room temp)
3/4 cup vegetable oil
1 1/4 cups white sugar (reduced from 2 cups)
1 ½ teaspoons vanilla extract
2 ½ cups shredded carrots, about 4-5 large (370 g)
¾ cup unsweetened flaked coconut (75 g, optional)
3/4 cup chopped pecans (or walnuts)
140 g crushed pineapple, drained well
1/2 cup chopped candied ginger

For the mascarpone frosting:
19 Tbsp butter, room temperature
3 cups powdered sugar
16 oz cream cheese, cool
8 oz mascarpone cheese, cool

For the cake: Preheat oven to 350 degrees F (175 degrees C). Line with parchment circles two 8-inch round cake pans. In a medium bowl, sift together flour, baking soda, baking powder, salt and spices. Set aside. In a large bowl, combine eggs, buttermilk, oil, sugar and vanilla. Mix well. Add flour mixture and mix well. In a medium bowl, combine shredded carrots, coconut, nuts, pineapple and candied ginger. Using a large wooden spoon or a very heavy whisk, add carrot mixture to batter and fold in well. Pour into prepared pans, and bake at 350 F (175 C) for 50 minutes. Press lightly in the center to check for spring and do the toothpick check (few crumbs cling to toothpick inserted in center). Cool cakes 15 minutes in the pans, remove and cool on wire rack for 5 hours until no longer warm. Wrap with plastic wrap and store at room temp overnight or in the fridge or freezer until ready to frost.

* we shredded 75% of the carrots by hand to produce an interesting texture and visible carrot pieces in the cake. We then processed the remaining unshreddable ends in the food processer until pretty finely ground, and added them to the cake to make 2 ½ cups total (370 g).

For mascarpone frosting: In the bowl of a stand mixer fitted with the paddle attachment, beat the butter and powdered sugar on lowest speed until all of the sugar is incorporated. Increase speed to high and beat 2-3 minutes until light and fluffy. Add cream cheese 8oz at a time, beating 1 minute after each addition or until smooth and fluffy. Add mascarpone cheese and beat 1 more minute or until smooth, satiny, and fluffy. Add more powdered sugar to taste or if your frosting is too stiff. Remove some frosting and add food coloring to make carrots.

Tuesday, December 27, 2011

The Ultimate Banana Cream Pie

Banana cream pie is already up to no good, so it wouldn't hurt to make it naughtier...
...by adding salted caramel and two types of shaved chocolate! But the food nerds think....
...there's STILL room for improvement. :D Updated, ultimate ultimate version coming in the near future. Stay tuned!

Monday, December 26, 2011

Christmas Desserts


It's a good thing we don't normally have this much spare time on our hands. The problem with making desserts is that we have no choice but to taste test along the way, so we inevitably get caught on a sugar high, which fuels our maniacal desire to churn out more desserts...with scrumptious yet fattening consequences. Some wise guys retort: Oh that's so silly, why don't you just exercise some self control and not nibble along the way? Clearly, they've never found themselves in the possession of a mixing bowl or whisk covered in some vanilla-scented pastry cream or warm chocolate ganache...or a few raspberries or blueberries that just missed the Fruit Tart Train. In these situations, before anyone can stop them, greedy fingers kidnap an unsuspecting berry and mercilessly smear it in some cream and chocolate...and the berry is never heard from again. A somber moment indeed, but at the same time an unavoidable sacrifice integral to the Circle of Life. Naaaaaa...tsaben yaaaa...Babbalycheebabbo! There is more to eat than can ever be eaten...

***

Christmas Dessert Menu

Assortment of cookies
Strawberry Blueberry and Pineapple Mango Linzer Cookies, Chewy Ginger Cookies, Dark Chocolate Macarons, Jasmine Creme Fraiche Macarons, Pistachio White Chocolate Cranberry Icebox Cookies

Fruit Tart
Tartine Bakery's Pate Brisee, creme fraiche pastry cream, assorted fruit, mango pineapple jelly glaze

Chocolate Rose Cake
Ina's Chocolate cake, cream cheese mascarpone berry filling, strawberry swiss meringue buttercream

Apple Cranberry Pie
Tartine's flaky pate brise, granny smith apples, cranberries, turbinado sugar


***

Recipes

Strawberry Blueberry and Pineapple Mango Linzer Cookies (adapted from Chewy, Gooey, Crispy, Crunchy, Melt-In-Your-Mouth Cookies)


Pistachio White Chocolate Cranberry Icebox Cookies (adapted from Chewy, Gooey, Crispy, Crunchy, Melt-In-Your-Mouth Cookies)

Dark Chocolate and Jasmine Creme Fraiche Macarons (adapted from recipes courtesy of the impossible-to-please chef, Yanqiang Tan :D)
Chocolate ganache (makes 20 macarons)
110g dark chocolate (Scharffen Berger 72%), finely chopped
110g creme fraiche (too tangy against the acidic Sharffen Berger...I'd use cream next time!)
38g butter, room temp

Heat cream in microwave until just about to boil. Pour the hot cream over finely chopped chocolate. Whisk slowly to melt chocolate. Add butter and stir until smooth. Cover with plastic wrap directly on the surface and refrigerate until just stiff enough to pipe but not too hard; alternatively, refrigerate overnight and allow to sit at room temp for 5 hours before piping.

Jasmine ganache (makes 20 macarons)
95g white chocolate (valrhona) chopped fine
105g creme fraiche (goes well with white chocolate's sweetness!)
8g jasmine tea leaves

Microwave creme fraiche until just about to boil; add tea leaves and infuse for 3 minutes. Meanwhile, heat white chocolate on 15-second intervals in the microwave until just melted. Strain the hot cream into the melted white chocolate, whisk until smooth. Cover with plastic wrap directly on the surface and refrigerate until just stiff enough to pipe but not too hard; alternatively, refrigerate overnight and allow to sit at room temp for 5 hours before piping.

Shells (makes 36-40 shells)
90 g almond flour
120 g confectioner's sugar
30 g granulated sugar
70 g egg white (2 large whites)
2 g cocoa powder, plus more for dusting (omit this for the jasmine ones; we dusted green tea powder on top instead)

Sift almond flour, confectioner's sugar, and cocoa powder with a medium-mesh sieve and whisk to blend. With oil-free beaters and a clean metal bowl, whisk egg whites until white and frothy, and add granulated sugar 1 tablespoon at a time while whisking on medium high speed. Fold 1/2 of the dry ingredients into the meringue until just incorporated. Add the remaining dry ingredients and fold 15-20 times to make a lava-like batter. Fill a piping bag fitted with a large round tip and pipe 2-inch circles onto a silpat-lined baking sheet. Rap them a few times to wake up the neighbors, remove air pockets, and flatten any stubborn bumps. With a fine mesh sieve, dust the tops with cocoa powder or green tea powder, depending on the flavor you want to make. Let rest for 45 minutes until dry to the touch, meanwhile preheating the oven to 300 F with rack on the lower third. Bake macaron shells on the lower third of the oven for 15-20 minutes, until the center ones don't wobble when nudged. Remove silpat onto the table and allow shells to cool 30 minutes before removing. Match them based on size and fill with ganache. Refrigerate or freeze immediately and allow them to get happy overnight. Allow to rest at room temp (30 minutes if from the fridge, 2 hours if from freezer) before enjoying.

Fruit Tart (inspired by Pastiche, Providence, RI)
The pastry cream can be made up to 48 hours in advance, but don’t fill the prebaked tart shell until 30 minutes or less before serving before serving. Once filled, the tart should be topped with fruit, glazed, and served within about 30 minutes (for best results). This recipe makes way more than a 9 inch tart. With the extra pastry cream and berries, make some baby tarts!

Pastry Cream
1 1/2 cup whole milk + 1/2 cup creme fraiche (can substitute 2 cups half and half)
1/2 cup granulated sugar
pinch table salt
1 1/2 teaspoons vanilla bean powder
5 large egg yolks, chalazae removed
3 tablespoons cornstarch
4 tablespoons unsalted butter (cold), cut into 4 pieces

Pate Brisee
1 1/2 Tsp Fine sea salt
2/3 Cup (150ml) Ice cold water
3 Cups + 2 Tbs (455g) All-purpose flour
1 Cup + 5 Tbs (300g) Chilled butter, cut into small cubes

Fruit and Glaze
assorted fruit, sliced 1/8 inch thin (raspberries, strawberries, mangoes, kiwi, blueberries, blackberries, persimmon)
1/2 cup pinapple mango jelly (can use apple or apricot jelly)

For the Pate Brisee: Place the flour and salt in a big bowl. Add the butter. Using a pastry blender, cut the butter into the flour until you obtain a mixture ressembling coarse sand. Pour the water over the crumbly mixture. Stir and toss with the help of a knive until the dough starts to come together. Continue mixing (very gently) until you obtain a ball of dough which is not completely smooth. On a floured surface, divide pastry in two, shape into a 2.5cm (1-inch) thick disk and wrap in plastic film. Put in the fridge and let rest for about 2 hours or overnight. Roll out one of the disks on a lightly floured surface to a thickness of 0.3cm (1/8 inch thickness) and from the center toward the edge in all directions, without forgetting to lift and rotate the pastry a quarter turn every now and then. Once your pastry is a circle 1 1/2 inches larger than the tart pan, carefully transfer it to the buttered pan (folding in half, if necessary). Ease it into the bottom and sides of the pan and pressing into place. Trim the edge with a knife. Prick the bottom of the pastry with a fork, line with baking paper and fill with pie weights or dry beans. Preheat the oven to 190° C (375° F). Bake blind until the surface of the dough looks dry and has no opaque areas left, about 20 minutes. Remove from the oven and remove the paper as well as the weights/beans, then return the shell to the oven for an extra 2-5 minutes (if the center starts to rise, gently pierce with a knife. Let cool completely on a wire rack before filling.

For the Pastry Cream: Heat the whole milk+creme fraiche or half-and-half, 6 tablespoons sugar, salt and vanilla bean powder in medium heavy-bottomed saucepan over medium heat until simmering, stirring occasionally to dissolve sugar. Meanwhile, whisk the egg yolks in a medium bowl until they are thoroughly combined. Whisk in the remaining 2 tablespoons sugar and whisk until the sugar has begun to dissolve and the mixture is creamy, about 15 seconds. Whisk in the cornstarch until combined and the mixture is pale yellow and thick, about 30 seconds. When the milk mixture reaches a full simmer, gradually whisk the simmering milk into the yolk mixture to temper. Return the mixture to the saucepan, scraping the bowl with a rubber spatula to make sure every bit makes it into the saucepan. Return the mixture to a simmer over medium heat, whisking constantly (this is important, don’t stop stirring!), until 3 or 4 bubbles burst on surface and the mixture is thickened and glossy, about 30 seconds to one minute. Off the heat, whisk in the butter. Transfer the mixture to medium bowl, press plastic wrap directly on the surface, and refrigerate until the pastry cream is cold and set, at least 3 hours or up to 48 hours.

To Assemble and Glaze the Tart: When the tart shell is completely cool, spread cold pastry cream over the bottom, using an offset spatula or large spoon. At this point, you can press plastic wrap directly on the surface of the pastry cream and refrigerate the filled shell for up to 30 minutes. Arrange the fruit on top of pastry cream from outside to inside. Bring the jelly to a boil in a microwave safe cup in the microwave. When boiling and completely melted, apply the jelly to the tart by dabbing and flicking it onto the fruit with a pastry brush; add 1 teaspoon water and return the jelly to a boil if it becomes too thick to drizzle. (The tart can be refrigerated, uncovered, up to 30 minutes.)

Chocolate Rose Cake
Ina's chocolate cake (baked in 3 8-inch round cake pans, made ahead and refrigerated tightly wrapped)

Strawberry swiss meringue buttercream (made right before assembly)

Cream cheese mascarpone berry filling (made right before assembly)
We made this on a whim, so the exact numbers may be off. We realized that we had gone from 12 sticks of butter to 1/2 a stick, so needed to improvise with this recipe a bit...and decided to add creme fraiche, which turned out to make the frosting exceptionally tasty.

1/2 stick of butter, room temp
1 cup powdered sugar
8 oz cream cheese
1/2 cup creme fraiche
blueberries, raspberris, strawberries, blackberries

Blend butter and powdered sugar with a pastry blender or fork. Using a handheld whisk, beat in the cream cheese and creme fraiche until smooth and whipped.

To Assemble the Cake: Place one of the three chocolate cake layers on a cardboard circle. Spread a generous third of the cream cheese mascarpone cream evenly onto the cake. Embed the cream layer with an assortment of berries, making sure the tops of the berries are even with the top of the cream. Place another cake on top, being careful to center it, and press lightly to anneal the layers. Repeat this process for the next layer of filling, topping with the third cake layer when finished. Put the remaining scant 1/3 of cream on the top of the cake and spread it down to the sides, smoothing it with an offset spatula to make a thin even crumb coat. Chill the cake in the fridge for 15 minutes if the kitchen is warm. If not, proceed with piping roses to entirely cover the tops and sides of the cake using the strawberry swiss meringue buttercream and a rose tip. Embed berries in between the roses. Store the cake in the fridge in a handmade cake box (get Annie to make one for you) until 2 hours before serving. Make sure you take the cake out at least 2 hours before serving so it can get happy at room temp and the buttercream will be melt-in-your-mouth creamy!

Apple Cranberry Pie


Sunday, September 4, 2011

Green, Purple, and Orange Salad


Gotta take advantage of the stone fruits while they're in season.

Green, Purple, and Orange Salad

mixed greens
sliced green bell pepper
sliced cucumber
feta cheese
plums
apple cider vinegar
olive oil

Mix up the veggies, fruit, and cheese and drizzle with olive oil and apple cider vinegar.

Sunday, August 28, 2011

White Chocolate Mousse Fruit Jewel Cake


Fluffy buttery vanilla cake filled with creamy white chocolate mousse and fresh grapes, frosted with crème chantilly and garnished with almonds, pistachio brittle, caramelized hazelnut powder, fresh figs, and grapes.
I'm usually a very modest person. But another one of my virtues as a human being is that I am honest. And it would be a violation of the moral fiber of my very soul to say that this little cake is not the most adorable little gem of a cake I had ever seen get created from my two hands. (I have submitted the previous sentence to the writers of the SAT for their writing improvement section). I simply adore natural decorations on a cake (translation - this person is too lazy/nooby to decorate cakes otherwise). Just look at the gorgeous villi-like innards of the figs contrasting with the shiny jet black skins, the little veins of the translucent grape flesh, and the organic shards of the nuts and iridescent caramel (mais non, I did not plagiarize from an anatomy text). I made the butter cake part ages ago and froze it. Then I split it in half - this was a genius maneuver because it enabled me to dodge my knack of mutilating soft cakes while sawing them into layers. I cheated on the white chocolate mousse too - it was made by pouring 1 cup hot cream on 2.5 oz of chopped white chocolate, stirring to melt, and then chilling the ganache and beating it til soft peaks formed.

Please let me redeem myself by telling you about the grapes. Those grapes were individually hand selected and peeled, cut in half, and seeds removed. The pistachio brittle and hazelnut caramel powder were made by pouring caramel over the nuts, letting it cool, and breaking it up. For the powder, I used the food processor to blast the brittle to smithereens. The outside of the cake is just lightly sweetened whipped cream (it sounds fancier when you call it crème chantilly), stabilized with "Whip-It." The almonds conveniently cover all the imperfections.

I learned a trick to making the cream smooth while frosting the outside! I don't actually think it's a trick...I'm pretty certain all legit cake decorators would roll their eyes upon hearing my profound discovery of dipping the spatula in a vat of hot water while smoothing the cream. Genius, huh?

Believe it or not, there are improvements I would make to this cake. The white chocolate mousse could be more legit. Although it was super simple to make, I thought the flavor was lacking in something. Maybe I would add some malted milk powder to it or use a mousse recipe with egg yolks. The crème chantilly, however, cannot be improved - kudos to whichever cow made that cream and the Hawaiian farmer who made that sugar. Oh, and I guess the matchmaker behind that happy marriage should get some credit too. I only used figs and grapes because all the other yummier fruits got eaten. If I could have my way, the cake would be filled with blueberries, raspberries, and blackberries, would be 3 layers tall, and would be topped with mango, kiwi, strawberry, and blackberry slices. Kind of like a fruit tart. It would be gorgeous! But I shall stop right there because I think I hear some sniffling coming from the fridge, and you know I hate to hurt cakes' feelings. Perhaps we can console it by devouring another slice...

Saturday, August 27, 2011

Chiffon Crazy

Chardonnay Chiffon. I googled "wine chiffon recipe" to see if anyone had done it and how they did...but to no avail. So I just went with a regular chiffon formula, swapping the 1/2 cup of liquid for chardonnay. I got lucky! The cake was heavenly. If you've ever had fermented sweet rice (tian jiu), this cake kind of tastes like that. It is amazing and the texture is perfectly soft, springy, and micro-crumby!
Lightly sweetened and with a delicious wine taste. See the bottle of Chardonnay in the first picture? I had no idea if it was good or not; just discovered it suddenly chillin' among the expired apple cider and cheap reds on the wine rack. After using it in the cake, we had a whole bottle to finish, so we had some for dinner.

my mom: sip. makes a face. Hm. Maybe someone who actually knows wine would appreciate this. This could be very 高级 but I wouldn't know...it's kind of...not sweet enough.

Well, I googled Meridian. Let me just say, it's the best.
Cream cheese chiffon. Sorry the picture is quite hideous. I dub it Chiffon In the Headlights. There is a secret ingredient that makes the cream cheese really stand out. You know those bags of buttery milky happy little dinner rolls you get from Costco? Or just any milky buttery mini bun thing. Like Hawaiian milk butter rolls. Anyway, this cake tastes like that! I know, magical, right? Guess what the secret ingredient is. Wow you're good! Why it is pecorino romano cheese!

Friday, August 26, 2011

Cake for Breakfast

Ginger Cake, from David Lebovitz's blog. It tastes kind of sharp and molassesy and too gingery the first day, but the spices mellow out and the flavors mature over the next few days and the cake just gets yummier and yummier! We reduced the white sugar by 50% and kept the molasses the same as the original recipe. It was plenty sweet. The orange dots on the plate are made of some sort of orange plum jam, but the jam didn't really match the cake's flavor. The cake tastes best with tangy yogurt, sour cream, creme fraiche, or cream cheese.

It is excellent for breakfast. This is such a balanced breakfast, and I know you will agree. Here's what's on the table (from the left)
1. black beans. simply cooked with no sugar or salt or any nonsense. delicious, my friend.
2. a jar of toasted wheat bran. yes, fiber is the redemption for your misdeeds.
3. ginger cake. mmmm!
4. raspberries and strawberries. healthy, right?
5. Japanese chiffon cheesecake and lemony sponge cake
6. peaches and figs
7. whole wheat flax seed yeast leavened baked bread stuffed with sweet paste (烧饼)
8. pineapples
9. fat free sour cream
10. fat free organic yogurt
11. homemade orange plum jam

We don't spoil ourselves enough. It's a tough life. Just a few more days of this...and it's back to oat bran and soymilk and bananas in the dorm!

Raspberry Slump

We saw this blackberry slump recipe in Saveur and fell in love. Sadly, our slump kinda slumped too much and didn't overflow like the model in the original picture. The raspberries were from Costco. We bought a pack of 6, ate two, fridged 2, and froze another 2 boxes. They. Were. Divine! Especially the slightly defrosted ones. Costco is just so awesome.

A list of our favorite things to get from Costco:
1. frozen blueberries
2. multigrain bread, the one in the green bag
3. dog food
4. shampoo
5. fish oil
6. wine
7. plastic wrap
8. nuts
9. raspberries!

A list of least favorite things to get from Costco:
1. milk. Seriously, who can drink milk that fast? Rather, whose fridge is big enough to fit 2 gallons?
2. romaine lettuce. unless you have a rabbit or two at home.
3. apples. they shouldn't be the size of softballs.
4. clothes. they never fit. I'm not sure what possessed me on the day I decided to try on a snow white costume that was designed for someone half my age, but a man walking by thought it'd be funny to ask, "Is that your wedding dress??" Unfortunately, a witty comeback escaped me as I pathetically struggled to regain circulation from the suffocating netting.

Anyway, this slump was amazing! Not sure why it's called a slump. Maybe it helps to lower expectations, so it tastes yummier. The concentrated tangy sweet baked raspberries and the buttery crumble topping were perfect complements to the white-wine flavored vanilla butter cake underneath. The wine flavor was my favorite part of the slump. I want to try adding wine to other butter cake recipes! Or perhaps a wine chiffon...mmmm

Raspberry Slump (adapted from Saveur)

2 1⁄4 cups flour
1 1⁄2 cups sugar
2 tbsp. unsalted butter,
cut into 1⁄2" cubes, chilled,

 plus 8 tbsp. melted and
more for greasing
1⁄2 tsp. baking powder
1⁄2 tsp. kosher salt
1⁄2 cup dry white wine
1 tsp. vanilla extract
2 eggs
1 lb. fresh or frozen thawed raspberries
Vanilla ice cream, for serving

1. To make crumb topping, combine 1⁄4 cup flour, 1⁄4 cup sugar, and 2 tbsp. chilled and cubed butter in the bowl of a food processor and process until mixture takes on texture of coarse bread crumbs, about 10 seconds. Refrigerate for 30 minutes.

2. Heat oven to 350°. Grease eight 6-oz. ramekins with butter and dust with flour; set aside. In a medium bowl, whisk remaining flour, baking powder, and salt; set aside. In a large measuring cup, whisk together melted butter and wine; set aside. In a large bowl, whisk together remaining sugar, vanilla, and eggs until pale and thick, about 2 minutes. Add wine mixture to eggs and whisk until smooth. Add flour mixture; mix until just combined. Divide batter between ramekins and top each with berries. Sprinkle reserved crumb topping evenly over berries. Put ramekins on a baking sheet and bake until golden brown and bubbly, about 1 hour. Transfer to a rack and let cool for 20 minutes; serve with scoops of ice cream on top.

MAKES 8 SERVINGS

Monday, August 15, 2011

Cavernous Cream Puffs

The cream puff is such a naughty way to indulge in cream. Its lumpy, humble external surface belies the dollop of gluttony that fills its cavernous interior. The best kind of cream for this indulgence is whipped cream lightened vanilla pastry cream - so billowy, light, yet creamy. With a drizzle of salted creme fraiche lemon caramel sauce on the inside of the puff, it is a divine experience.
I used to think huge cream puffs were the ultimate indulgence. But now I think small ones are better. The shell is crispier, and the ratio of cream to shell is perfect for enjoying a few delicious bites. Cream doesn't dribble down your chin when you eat it. And, the best part is that you can eat several because they are small.

Sunday, August 14, 2011

Milky Way Tart and Raspberry Cream Tart

Raspberry cream tart with rum laced pastry cream and caramel-lined almond sugar butter crust. I think I would've preferred a flaky buttery tart shell because it is lighter and more exciting when it shatters in your mouth, but this was deliciously crunchy and buttery too.
The Milky Way Tart is genius. It's supposed to be a thick layer of caramel topped with a billowy, magical layer of whipped milk chocolate ganache. I was too stingy with the caramel, unfortunately. Maybe a little stingy with the cream too. Next time, I would totally use a flaky tart shell, spread at least 1 cm of caramel, and load up on the cream. It would be a dangerous combination.


Milky Way Tart
Adapted from Joanne Chang's Flour: Spectacular Recipes from Boston's Flour Bakery + Cafe

Makes 1 9-inch tart

For the tart shell, use your favorite pie or tart dough recipe, baked off in a 9-inch tart pan with a removable bottom.
For the milk chocolate mousse:

5 ounces milk chocolate, chopped (we used quality milk choco chips)
2 cups (1 pint) heavy cream
1 teaspoon instant espresso powder
1/8 teaspoon kosher salt

For the caramel filling:

3/4 cup granulated sugar
1/3 cup water
1 tablespoon corn syrup
3/4 cup heavy cream
2 tablespoons unsalted butter
1/4 teaspoon kosher salt
2 teaspoons vanilla extract

For the tart assembly:

One baked and cooled 9-inch tart shell (like My Favorite Pie Crust)
3-to 4-inch slab milk chocolate, at warm room temperature, for decorating


Place the chopped chocolate (or chocolate chips) in a medium heatproof bowl.

Gently heat the cream with the espresso powder and salt in a small saucepan over medium heat. As soon as you see bubbles beginning to form around the edges of the pan, remove it from the heat--don't let the cream come to a boil. Pour over the chocolate and let sit for 1 minute. Whisk until smooth. Transfer the mixture to a mixing bowl (I prefer a metal bowl for faster cooling, and poured it straight into the bowl of my standing mixer). Cover the bowl tightly with plastic wrap and place in the refrigerator until very cold, at least 8 hours and up to 3 days ahead. The mixture needs to be extremely cold in order for it to whip properly, so don't skimp on the chilling time. If you are short on time or generally impatient like me, throw the metal bowl into the freezer and give it a good whisking every 5-10 minutes or so--you can complete the chilling this way in about an hour.

To make the caramel, place the sugar, water and corn syrup in a medium saucepan and stir well to combine. Bring the syrup to a boil over medium-high heat and cook until the syrup becomes a deep amber color. Pull the pan from the heat when you see it reaching a deep golden color--it takes only a moment for caramel to go from golden to amber to straight up burnt, so pull it early if in doubt. Stirring constantly with a whisk or heatproof spoon, stir in the cream all at once. Be careful--it will bubble up violently, but keep stirring until the lumps of caramel smooth out once again. Stir in the butter, salt and vanilla. When the caramel is smooth and well-blended, pour it into a small heatproof container and set in the refrigerator to cool and thicken, at least 4 hours or up to 1 week. Again, using a metal container (I use a loaf pan) will cut this time down significantly.

When the cream mixture and caramel have both cooled sufficiently, assemble the tart. Place the tart shell on a serving platter. Spread about three-fourths of the caramel evenly over the bottom of the tart shell. Fit the bowl with the cream mixture onto a stand mixer fitted with the whisk attachment and whip on medium-high speed until stiff peaks form (or beat with a handheld mixer). Mound the chocolate mousse on top of the caramel and smooth evenly.

Using a vegetable peeler, make chocolate curls from the bar of milk chocolate: warm the bar slightly in the palm of your hand before pulling the peeler across it to get curls instead of just grating the chocolate. Drizzle the tart with the remaining caramel and follow it with a generous sprinkling of chocolate curls. Refrigerate the tart for 30 minutes before serving (or airtight for up to 8 hours).

Wednesday, August 10, 2011

How to Enjoy Vanilla Ice Cream

...on top of a toasted shard of rum-drenched vanilla pound cake, topped with crushed toasted pistachios
...with pistachio brittle, hazelnut brittle, or pecan brittle

or in a sundae with fresh raspberry coulis, blackberries from a nearby berry bush, pistachio brittle, and creamy luscious caramel sauce drizzled on top!

Monday, August 8, 2011

The Wonders of 日本料理

Hamachi sashimi with shiso and ikura. Do you see the marbling of fat on the hamachi? The pairing of that fine marbling with the lovely weblike design on the shiso leaf is entirely intentional, thank you for noticing. And I'm not sure what shape your eyes are, but is it just me or does that center shiso leaf cradling the little eyeball-like ikura not resemble an eye? Tell me that's not genius right there. You can't? Oh come on. Not to mention, the sashimi was delicious with shiso, ikura, some wasabi, ripe avocado, and toasted salted nori. Soy sauce was utterly unecessary; the ikura provided just the right savory touch. Rice would've been good but we were too lazy to make it.
Bought these egg molds from Daiso in Berkeley. Aren't. they. adorable? The first time I tried, the eggs were not big enough, so they came out very pathetic looking. So I purposely went hunting for not large, but extra large eggs for this important order of business.

I admit, eggs do taste better when they are in pretty shapes. So there you have it - two classics of Japanese cuisine. Sashimi and the Molded Egg. (What are you grimacing at? I said molded, not moldy)


Sunday, July 31, 2011

Lemon Chiffon

My aunt, who is visiting from China, doesn't like sweet desserts. So I thought I would make a cake that tempered sweetness on multiple fronts. This is a lemon chiffon cake filled with nectarine whipped cream and frosted with cream cheese creme fraiche whipped cream, topped with yellow and white nectarine compote.

I overdosed on lemon zest in the cake and reduced the sugar by 30%. The peach compote also has just a sneeze of sugar. And the tang of the cream cheese and creme fraiche also help combat the sweetness, in theory.
My aunt took one bite and said, "太甜了!" (too sweet!!) I thought, "不会吧!" no way! Was it really that sweet? I had to try another slice. And maybe another. This was for the sake of research, you know. I wanted to make a cake that she would like...and I was curious just how much you could reduce the sugar in a cake before it became inedible. So I made another lemon chiffon cake and used only 60 g of sugar! That's like, 4 measly tablespoons. For a whole 7-inch cake. That's a reduction of 50-70% from most recipes. I thought, this cake will probably be disgusting, but my curiosity got the better of me.

It turned out okay! In fact, I might've overdosed on salt just a smidgeon...haha. But the cake was ever so delicately sweet and delightfully lemony and feather soft. I also didn't put vanilla extract because my aunt can detect that and doesn't like it. Nevertheless, the cake was very flavorful from the lemon zest and juice. The verdict? "还是太甜了!" still too sweet. I think she's getting 蛋糕 (cake) confused with 馒头(steamed bun). Oh well...I guess I'll just have to eat these three cakes solo. Thank you, your sympathy is greatly appreciated.

Saturday, July 30, 2011

Loofah and Egg / Belt Fish

This green veggie is called (thank you googletranslate) Loofah. Whoever named it was a genius. The story behind this dish...you see those eggs? I usually put about 2 eggs. This time there were 4 whites and 5 yolks and maybe a little too much oil. I was making a lemon chiffon cake and accidentally dumped the oil into the egg whites instead of the yolks. I was in shock for about 30 seconds. Then I had the brilliant idea of stir-frying the eggs with loofah! Before cooking, I poured the oily eggs into a tall narrow glass and mopped off the oil with paper towels and a spoon (I'm a genius, I know). And don't worry about the chiffon...it was made alright. The egg carton is just a little empty now.

Loofah and egg go together like crazy. Let me just say, the eggs were delicious! They were just beaten with 1/6 tsp kosher salt and fried til golden, and flavored with a splash of soy sauce. Loofah is incredibly bland unless you add garlic, egg, and the right amount of salt. Then it's amazingly sweet! And even better with a crackling of numbing saliva-inducing Sichuan peppercorn. I have to admit...I cheated and added homemade chicken broth while cooking the loofah...shhhh don't deflate their self esteem!

This fish is called belt fish. Whoever named it needs to talk to whoever named the Loofah. It is caramelized with ginger infused soy sauce, caramel, Shaoxing wine, and black vinegar. The crusty, caramel sweet skin is the best part!

Saturday, July 23, 2011

Oxtail Soup...Again

Is this bowl finished? Are you crazy? That little morsel right there. Yes, it's making eyes at you. That's the secret hideout for the Yum Yums. Shhh they don't know you're here. You're supposed to pick it up and coax the juices out from deep within the bone. All the tomato-y beefy goodness...
The worst part about making and eating oxtail soup is getting to the bottom of the bowl. So this time...we'll turn back time!
Perfectly tender and fall-off-the-bone good. But not completely disintegrated. That's important - we don't want to eat the Gerber's version of oxtail soup. Wouldn't that be awesome if Gerber made oxtail soup in babyfood form? Those poor babies...I guess privileges do come with getting teeth.
Do you see the slight crusty brown coloration of the meat that is staring you in the face? That, my friend, is flavor. The result of a good sear before braising!
The biggest bones are the best. So many nooks and crannies and tendons and ligaments and deliciously meltingly tender collagen...sorry, too much anatomy huh. Excuse my enthusiasm; you had to be there to understand.
I don't think these photos are really in any logical order. But no matter. If that meat doesn't look tender, you can just leave right now. I need some private time with my soup anyway.
Do you know how much self control it took to take all those pictures? Thank you, I know I just outdo myself every time. And because I'm so nice...I'll even share with you the top secret recipe.

Before I do, I have a funny story. At the supermarket, while I was gawking at the oxtail, this nice elderly man (who didn't really speak English) and his granddaughter were next to me and he goes, "Oh, what is that?"
Me: "Oh, this is oxtail."
Him: "Huh?"
Me: "It's the tail, you know..."
Him: "Oh! The neck?"
Me: "No no, the tail, in the back..."
Him: "Ohhh."

I guess cows have gotten a little larger since his days.

Oxtail Soup...Again
This makes a relatively small serving. I would say it serves 3 people - with a maximum of two people who like to eat meat. The third person must be content with not having a large oxtail piece. Double it for larger company! The keys to this recipe are that the oxtail and veggies must be seasoned with a healthy single layer of sea salt, and the oxtail must be seared on high heat almost to the point of burning. Also, the tomatoes must be ripe and sweet or the broth will be too sour and watery; if you cut open your tomatoes and they are whitish instead of completely dark red inside, add tomato paste or sugar to the broth. Don't be scared by the 2 bulbs of garlic; they are imperative for flavor and the long braise just makes them meltingly sweet and mellow. The purple onion and garlic added in the beginning and end ensure complex flavor development throughout the braise as well as intense sweetness of shorter-cooked onion and garlic. The beauty of this recipe is its simplicity - no need to add beef stock, chicken bouillon, bouquet garni, flour, etc. There's a lot of oil in the end, so be sure to skim it off, or you will suffer a very unpleasant oily mouthfeel when you drink the soup. And trust me, you'll want second servings of the lovely beefy, sweetly concentrated tomato soup.

Oxtail - 2 HUGE bones, 3 medium ones, 1 tiny one
Sea salt or kosher salt
2 Tbsp oil
3/4 cup Shaoxing wine
2 bulbs of garlic, one bulb minced and the other bulb peeled
1 large carrot, sliced on a diagonal into 1-inch pieces
2 celery stalks, sliced into 1-inch pieces
1 large fresh organic red onion, sliced into 1-inch pieces
1 1-inch piece of fresh, good quality ginger, peeled and sliced
4 large ripe tomatoes, 1 ripe roma tomato, 8 ping-pong ball sized ripe sweet tomatoes
1 cup of purple sweet potatoes, cut into large chunks

Prepare the meat: Take it out of the fridge, dry very well with paper towel, and sprinkle one layer of sea salt on one side. Let it rest at room temperature for 15-20 minutes to take off the chill to promote better searing.

Sear the meat: Heat a medium soup pot over high heat 2 minutes until hot. Add 2Tbsp oil and swirl, heating until oil starts to ripple. Add meat in a single layer, salt side down. Sprinkle the other side with salt, put the lid on, and let it sear for 2-3 minutes until you get a very dark brown crust (This is the flavor concentration! Make sure to get that dark brown crust). Turn the meat and sear very well on all sides, replacing the lid each time, unless you want to smell like a piece of seared meat.

Deglaze the pan: Remove the perfectly seared meat and set on a clean plate. The pot will be very hot at this point, and the yum-yums at the bottom may be threatening to burn. Turn the heat down to medium and add the 3/4 cup wine all at once, scraping the bottom of the pan to remove the yum yums. Pour this delicious liquid into a small heatproof bowl and set aside. Don't you dare let anything dangerous get near it.

Brown the veggies: Turn the heat once more up to high. Your pot should be pretty clean right now. Add 2 Tbsp more oil and swirl to coat. When oil is hot, add the finely chopped garlic, ginger, carrot, celery, and HALF of the onions to the pot. Sprinkle with an even layer of sea salt and toss the veggies to coat evenly with salt and oil. Cover with a lid and allow to cook for 5-7 minutes, until slightly softened.

Simmer down the tomatoes: Add the tomatoes and smash them with the back of a spatula, mixing them with the veggies in the pot. Replace the lid and continue cooking on high for 5-7 minutes until the mixture is boiling and the tomatoes are releasing liquid.

Replace the meat and simmer for a long time: Add oxtail back into the liquid, pushing them all the way to the bottom of the pot and covering every piece with the liquid. Turn the heat down to low, cover with a lid, and maintain a gentle but even simmer for 3 hours.

Add additional veggies and adjust salt: Toss in the remaining garlic cloves, onions, and sweet potato and push them into the soup. Taste the soup and add more salt if needed. Simmer for 45 more minutes.

Skim off the oil and swallow your saliva: Using an oil skimmer or a very flat wok spatula, take off the top layer of red orange oil to a wide shallow bowl. Be patient - this may take 20-30 spatula-fulls. Press down on the tomatoes to coax the oil to the top of the soup. Continue until you don't see too much red oil on top. Pour the oil mixture into a glass measure cup and gawk at the layer of fat that rises to the top. Cover with plastic wrap, and allow to cool at room temp before putting it in the fridge (use it to braise ox tendon later!). Help yourself to a big piece of oxtail and savor every second.