No matter what type of kitchen you have, be
it a high-tech stadium riddled with standmixers and food processors or a humble
college dorm kitchen, you can be a macaron chef. There are countless recipes
online with macaron myth busters and intense debates concerning the following:
Egg whites - to age or not to age?
French vs. Italian meringue - which produces smoother shells and frillier feet?
Egg white powder - to add or not to add?
Silpat vs parchment
Convection vs non convection oven
Color of baking sheets
Type of almond flour
Cornstarch in confectioners' sugar
Copper bowl vs glass bowl for beating egg whites
Temperature of oven
Oven door - to crack open or not?
Humid days - okay to bake or not?
Oven door - to open once, twice, or no times during baking?
Simultaneously baking two sheets of macarons - against the law?
And on and on. We’ve tried them all (almost). These are the
tips and tricks distilled down to a single blog post. Here is our no-fail master recipe for macaron shells. (scroll all the way down for green tea ganache recipe) Bon appetit!
EQUIPMENT
food
processor or spice grinder
2
large mixing bowls, preferably glass (Pyrex) or stainless steel
hand
mixer or whisk
medium-mesh
sieve (If you lack food processor)
rubber
spatula
kitchen
scale
large
piping bag (16 inch)
large
round piping tip (about 1/2 inch diameter)
parchment
paper or 2 Silpat non-stick baking mats (11.5 x 16.5 inch)
2
aluminum baking sheets (12 x 17 inch)
INGREDIENTS
100g
whites (3 large eggs; aged 12-24 hours at cool room temp, covered with plastic
wrap poked with holes)
40g
granulated white sugar
190g
powdered sugar
120g
almond flour (Bob’s Red Mill is a reliable brand, although Trader Joe's works fine too)
Up
to 5g powdered flavoring (optional; cocoa, green tea, freeze dried fruit, etc)
Directions for the
low-tech kitchen
Place sieve over large mixing bowl on top of a kitchen scale. Add 165
grams of almond meal and 190 grams of powdered sugar. Using a rubber spatula,
pass the mixture through the sieve (you should have about 120 grams of almond
flour after the coarse pieces have been sifted out). If you have a spice
grinder, you can sieve 120g of fine almond flour, process the remaining larger
pieces of almonds with a few tablespoons of the powdered sugar (to prevent
clumping due to moisture), and add it back to your dry mix. Whisk well and set
aside.
Measure out 40 grams of granulated sugar into a small bowl. Measure 100g
egg whites into a large glass mixing bowl (be careful to make sure the mixing
bowl is free of grease/oil). Prepare a parchment or Silpat-lined baking sheet
and piping bag fitted with large round tip. Twist the end of the piping bag
near the tip and secure with a clip for easy filling later.
Whisk the egg whites until white and foamy. Gradually add the granulated
sugar while whisking. When all the sugar has been added, whisk as fast as you
can until the egg whites form stiff peaks when you lift your whisk, and the
entire bowl can be turned upside down without anything sliding out. When you
reach this point, stop whisking.
Add almond sugar mixture to the egg whites. With a rubber spatula, gently
fold in the almond meal mixture. Start slowly and mix just until the two are
moistened evenly and flow like lava, not that most of us knows what lava looks
like.
Use a spatula to scrape the mixture into the prepared piping bag. Being
sure not to trap any air, twist the top of the piping bag closed. With tip
pointing toward the ceiling, remove paper clip and gently squeeze batter out to
the top. Pipe shells 1.5-inches in diameter on your lined sheet, taking care to
space shells at least 0.5 inches apart to prevent them from spreading and fusing
into each other (unless you want to make macaron snowmen or Mickey’s, which is
sometimes the case).
When the shells have been piped, rap the baking sheet several times on
the counter to smooth them out and remove air bubbles. Decorate them while they
are still sticky and wet (sieve green tea powder on top, sprinkle on chopped
nuts, etc). Let the macarons dry before baking. They should feel smooth and not
stick to your finger when you touch them (this takes 30 - 60 minutes, depending
on the humidity).
Bake one sheet at a time in the center of a convection oven for 15
minutes at 275 F. Or, bake in the bottom third of a non-convection oven for 20
minutes at 300 F. Check on the shells 3 minutes before scheduled done time.
They should not look wet, but should not be browning. If they are browning
before they are completely set, turn down the heat. Remove Silpat from baking
sheet and let macarons cool completely on the counter before removing.
Directions for the
high-tech kitchen
With stand mixer or electric beaters, whisk the egg whites until they
just turn white and gradually add the granulated sugar until you obtain a
glossy meringue.
Combine the ground almonds and powdered sugar in a food processor and
give them a few quick pulses. It will break the powdered sugar lumps and
combine your nuts with it evenly. Add them to the meringue and fold the mass
carefully until you obtain a batter that flows like magma or a thick ribbon.
The whole folding process shouldn't be more than 50 strokes.
Test a small amount on a plate: if the tops flattens on its own you are
good to go. If there is a small beak, give the batter a couple of turns. Fill a
pastry bag fitted with a plain tip with the batter and pipe small round (about
1.5 inches) onto parchment paper baking sheets. Let the macarons sit out for an
hour to harden their shells a bit. Bake one sheet at a time in the center of a
convection oven for 15 minutes at 275 F. Let cool completely.
Macarons in 10
steps
1.
Grind almonds and powdered sugar in food processor
until very fine.
2.
Whisk egg whites and granulated sugar to make a
stiff meringue.
3.
Fold together powdered mix and meringue until
mixture resembles slowly flowing lava.
4.
Fill a piping bag and pipe 1.5 diameter evenly
spaced blobs onto lined baking sheets.
5.
Decorate the shells when still moist.
6.
Let shells sit out for 30-60 min in a cool dry place
until they don’t stick when lightly poked.
7.
Bake one sheet at a time in the center of a convection
oven for 15 min at 280 F til just set (doesn’t wobble when nudged) and not
brown (turn down heat if browning before set).
8.
Let cool completely, remove shells from sheet, match
up the shells according to size and fill them.
9.
Store in the fridge overnight to allow macarons to
mature in texture and flavor.
10.
Serve at room temperature for most intense flavor
and creamiest texture.
33 Indispensible tips
for macarons
1.
Don’t age egg whites too long; if you have to store
them for longer than 24 hours before using them, place them in an airtight
glass container in the fridge so they don’t dry out too much and produce tough
shells.
2.
Make sure almond flour and powdered sugar are finely
ground. Large lumps or shards will produce grainy shells.
3.
Weigh ingredients - use an accurate scale on a flat
surface; remember if you age the whites they will have lost moisture so whites
aged for longer than 24 hours can benefit from some liquid food coloring or
vanilla extract to dilute the protein content.
4.
Make a stable meringue – make sure there is no oil
or water contaminating your whites, and beat meringue slowly at first and
faster toward the end while very gradually adding the granulated sugar.
5.
Room temperature whites beat up faster than cold
whites, but cold whites work in a pinch (just be prepared to beat a little
longer).
6.
Don't overbeat the meringue past stiff peaks to
dryness (this rarely happens, as the sugar in the meringue protects against
over beating).
7.
For frilly feet that protrude sideways, add
additional powder (such as cocoa powder, green tea powder, freeze dried strawberry
powder) but don't exceed 5g for a recipe using 100g whites or your shells will
be mealy and squishy inside.
8.
Let the shells rest until they form a dry skin (30
min to 1 hour) that does not stick to your finger when you gently poke it.
9.
The biggest difference between macaron recipes is
the ratio of white sugar to powdered sugar: high white sugar content will lead
to dull, domed shells with short feet; too low white sugar content will lead to
very runny hard to pipe batter and possible air pocket or thin tops (weaker
meringue, especially if egg whites are not aged or too much food coloring
added). We found the optimal ratio for shiny shells with healthy feet to be
19:4 powdered:granulated (about 5:1).
10.
Decorations – too heavily garnished shells may crack
when baked. Ideas for garnishes: freeze dried fruit powder, green tea powder,
chopped nuts, tea leaves, patterns painted with food coloring after shells have
been baked
11.
We dislike adding colors because they introduce
unwanted liquid, but if you want to recreate the pastel colored macarons of
Laduree, use only a few drops of concentrated food coloring gel or powdered
food coloring, and whisk into the meringue before folding everything together.
If you only have the super liquidy stuff, age your whites for 2-5 days to dry
them out more and compensate for the added liquid.
12.
Don’t underbake. Soggy shells are really hard to
remove and can be too mushy. Don’t lose hope, however; simply use a spatula to
carefully scrape off any stuck bits and add them to the shells. Make a drier
filling and don’t let the macarons mature too long in the fridge before eating;
serve them in Las Vegas or a comparable desert.
13.
Don’t overbake. Hard, overbaked shells are too dry.
To remedy this, use a super moist filling and let the macarons mature in the
fridge for at least two days to let the shells reabsorb some moisture from the
filling. Serve them on a tropical island.
14.
Know your oven. Use an oven thermometer to make sure
it is actually heated to the right temperature, and if your oven has hot spots,
you can rotate the pan halfway through baking.
15.
Bake one sheet at a time. Overloading your oven may
reduce the temperature or impede air flow in a way that leads to poor feet
formation or cracked tops.
16.
Baking in a convection oven at 275 F provides the
most even heating. A regular oven (no fan to distribute the heat) works too but
be sure to increase temperature and timing to suit your needs.
17.
Silpat or parchment: Silpats can produce rounder
shells with flatter bottoms, but can cause sticking if used with light colored
baking sheets. If using parchment, be sure that the parchment is cut to fit
your baking sheet so it lies flat and doesn’t cause warping of the shells.
18.
Type of baking sheet: darker colored sheets have
superior heat conduction, producing better feet and reduce stickage. However,
using a dark sheet with parchment paper may result in too much bottom heat; to
remedy this, use Silpats (good insulators) with darker sheets (good heat
conductors) and parchment paper (poor insulators) with lighter baking sheets
(poor heat conductors).
19.
Don’t reduce the sugar in the shells. The listed
amounts are already at bare minimum and are important for structure. If you are
sugar phobic, use unsweetened fillings to temper the sweetness (a good example
is black sesame mascarpone, or cashew cream).
20.
Cool the shells completely before removing them from
the Silpat or parchment. Attempting to remove them while still hot will result
in stickage.
21.
If filling is runny, freeze filled shells
immediately, and then transfer them to the fridge.
22.
Serve macarons at room temp for best texture and
flavor. For best enjoyment, eat only one at a time and savor it slowly with
hot, unsweetened tea.
23.
Let the macarons mature at least overnight, although
very moist fillings don't need to mature and should be eaten ASAP because after
a night or two they become soggy.
24.
Amount of filling: not too much or little; go with a
2:1 ratio of shell:filling
25.
Size should be not too small or big. 1.5-2 inches in
diameter is perfect.
26.
For perfectly round shells, align the piping tip
perpendicular to the baking sheet and “cut” away the peak that your piping bag
leaves by drawing a quick semicircle with your tip.
27.
What to do with the yolks: ice cream, mousse,
scrambled eggs, pasta, truffles, molten cake, Creme brûlée, pastry cream.
28.
Some recipes recommend high heat (375 F) in the
beginning for feet formation, then turn down the heat to avoid browning the
shells (300 F). We find that this is not necessary and that 280 F convection
provides the most even heating, but experiment with your oven to find the best
temperature for you.
29.
Experiment with the shapes of the shells to make
snowmen, fish, kitties, mickeys; intentionally or unintentionally.
30.
Be creative with flavors. The possibilities are
endless! You can flavor the shells by adding up to 5g of coffee, cocoa, green
tea, dry fruit powder for 100g of egg whites or substituting 25-50% of the almond
flour with hazelnut, pistachio, walnut, sesame, flax seed, pecan, or sunflower
seed flour. Be wary of adding extracts or liquid flavorings into the shells.
For the filling, low-sugar fillings tend to work well (tea, acidic fruits,
citrus, black sesame, olive oil ganache, crème fraiche, chocolate, coffee,
burnt caramel). For textural contrast, add a fruit jelly (honey lemon,
passionfruit, grape, blackberry, balsamic vinegar).
31.
Too low heat may lead to air pocket and poor feet;
high heat is needed to set the meringue and produce the steam needed to rise
for good feet. Experiment with your oven to get the right temp; around 280 F
convection and 300 F non-convection is usually good.
32.
Too high heat may cause the shells to brown on top
before they are completely set. To rescue quickly browning shells, turn down
the heat by 25-50 degrees F and take them out when just set. Macaron snobs
frown down on browned tops because they are not traditional, but we think they
add a nice roasted flavor that could be a welcome contrast to the sweetness.
33.
The macaron standard: shiny, flat, round, smooth,
light, no air pocket, nice feet, flat base, not too dry or browned, light
delicate shell shatters to reveal sublimely creamy filling, not too tough and
chewy, 2:1 shell:filling, not too too sweet
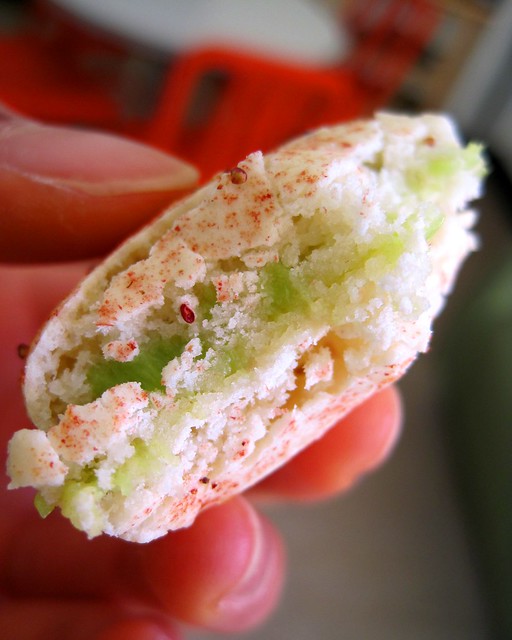
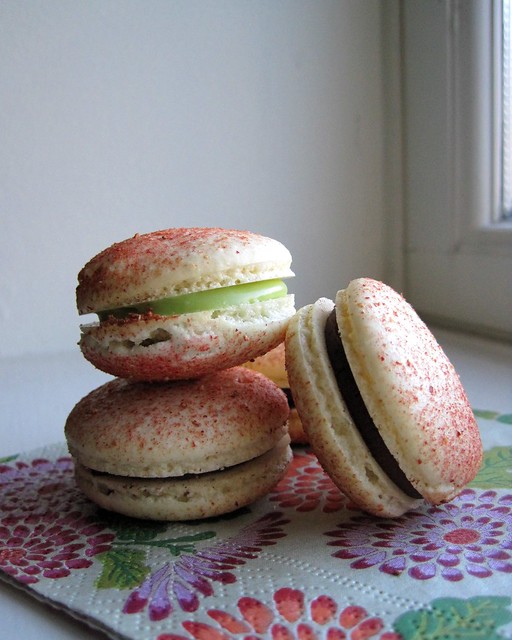
Green Tea (Matcha) Ganache
118 grams white chocolate
1.5 teaspoons quality green tea powder
80 grams creme fraiche
45 grams organic unsalted butter
Melt the white chocolate. Place
the white chocolate in a microwave safe bowl and microwave on high for 30
seconds. Remove the bowl and stir chocolate with a spoon to distribute the
heat. Microwave on high for 20 seconds. Remove and stir. Microwave on high for
15 seconds. The chocolate should be about half melted by now. Continue to
microwave on high for 10 second bursts and stir in between until the chocolate
is just melted. Be careful not to microwave too long or the chocolate will burn
or dry out.
Add
the green tea powder. Sift the green tea powder over the melted white chocolate and
whisk slowly until smooth.
Heat
crème fraiche. Spoon the crème fraiche into a microwave safe bowl and heat
until just boiling. Pour it into the white chocolate green tea mixture and
whisk carefully to combine; it will look like it won’t want to combine, but
don’t worry. Add butter and whisk until smooth. Place a piece of plastic wrap directly over the surface of the
ganache to prevent a skin from forming, and store on the counter for 2-3 hours
until firm and mashed potato consistency (good for piping). If you’re rushed,
you can stash it in the fridge for 30 minutes to 1 hour but remove the ganache before
it sets up too firmly and becomes difficult to pipe.
Assemble the macarons,
Stack the macaron shells together based on size and line them up in two rows on
two clean baking sheets. Remove the top shells to reveal the overturned bottom
shell. Using a rubber spatula, fill a round-tip fitted piping bag with the
ganache. Pipe a dollop of ganache in the center of each overturned bottom
shell. Test the amount of filling by sandwiching the two shells together.
Adjust the dollop size as needed to achieve a shell:filling ratio of 2:1 or
3:1.
Store filled macarons in
an airtight container in the fridge over night and enjoy the next day. For
longer storage, transfer to the freezer and store for up to 2 months. Be sure
to defrost at room temperature before savoring.